Effortless No-Chill Gingerbread Cookies: Your Ultimate Guide to Fast & Fun Holiday Baking
Discover the magic of stress-free holiday baking with this incredible no-chill gingerbread cookie recipe. Created out of a genuine need for speed and simplicity, these No Chill Gingerbread Cookies live up to their name – no waiting around for dough to firm up in the fridge! This means you can roll, cut, and bake immediately, making it the perfect gingerbread man recipe for busy parents, preschoolers, younger kids, or anyone with limited time who craves delicious, beautifully shaped gingerbread without the fuss. Life is truly too short to wait for cookie dough to chill!

This popular no-chill, no-spread gingerbread cookie recipe is a holiday season favorite, inspired by a delightful baking activity I organized with my daughter’s Girl Guide group. The goal was to create a recipe that could be made, baked, and decorated within a tight timeframe, and these cookies delivered perfectly. They hold their shape beautifully in the oven, ensuring your gingerbread men and festive cutouts look exactly as intended, every single time.
🍒Reader Reviews & Testimonials
“These are absolutely delicious and maintain the shape of the cookie cutter wonderfully. The best part is not having to wait for the dough to chill. Thank you so much for this brilliant recipe!” ⭐⭐⭐⭐⭐
PINTEREST: “This recipe was a lifesaver! It worked perfectly and saved the day when we needed a batch of cookies at the very last minute for a school event. Highly recommend!” ⭐⭐⭐⭐⭐
If you love easy and delightful cookie recipes, you might also enjoy my easy whipped shortbread cookies (made with cornstarch)!
For years, since my daughter was just five, I’ve had the joy of leading Christmas baking sessions with her Sparks, Brownies, and Girl Guides groups. One memorable year, I set out to teach her Girl Guides troop how to make classic gingerbread cookies. However, I quickly realized that a standard recipe wouldn’t cut it. I needed a quick, efficient, no-chill, and stovetop-free recipe that allowed for mixing, rolling, cutting, baking, and decorating to be completed in under two hours – a tall order for a group of energetic kids!
🥘Key Ingredients for Perfect No-Chill Gingerbread
Given that we were baking at another leader’s house with limited oven access and no available stovetop, the recipe had to be adapted. This led to the development of a gingerbread cookie dough that could be easily prepared using a microwave, simplifying the process even further.
Here are the essential ingredients you’ll need for these delightful gingerbread cookies:
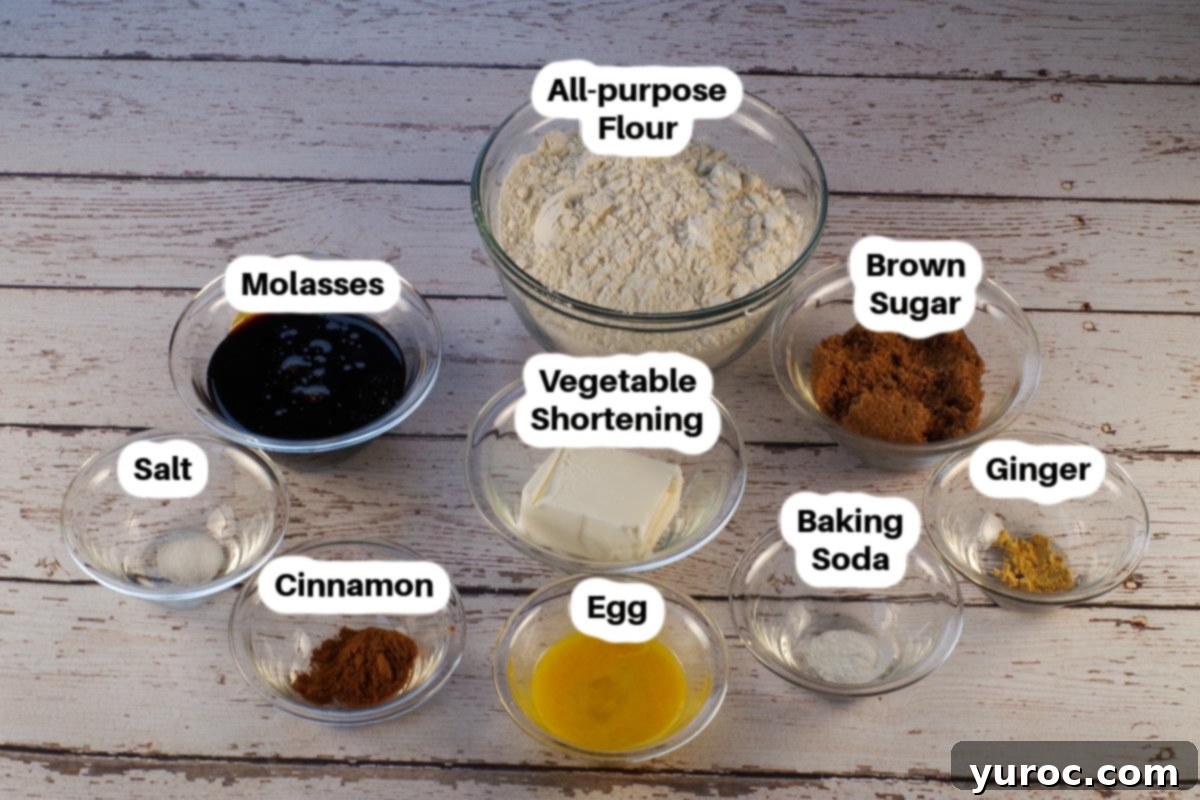
- Molasses: This is the heart of gingerbread flavor! You have options here – light, dark, or even blackstrap molasses can be used. Each type will lend a slightly different depth and intensity to your cookies. Dark molasses offers a richer, more robust flavor, while light molasses provides a milder sweetness. The choice is yours, but any will work beautifully in this recipe.
- Brown Sugar: Whether you opt for dark or light brown sugar, your cookies will turn out wonderfully. The primary difference will be a subtle variation in color and a slight nuance in flavor. Dark brown sugar will give a deeper, more caramel-like note, while light brown sugar offers a classic, gentle sweetness. Both contribute to the chewy texture and signature taste of these gingerbread treats.
- Vegetable Shortening: This ingredient is key to the “no chill, no spread” success of this recipe. Unlike butter, shortening has a higher melting point and helps create a sturdy dough that holds its shape exceptionally well during baking. I typically use whatever brand I have readily available, such as Crisco or any generic vegetable shortening. It’s the secret weapon for perfectly crisp edges and soft centers without refrigeration.
For charming decorations that bring your gingerbread creations to life, gather the following items:
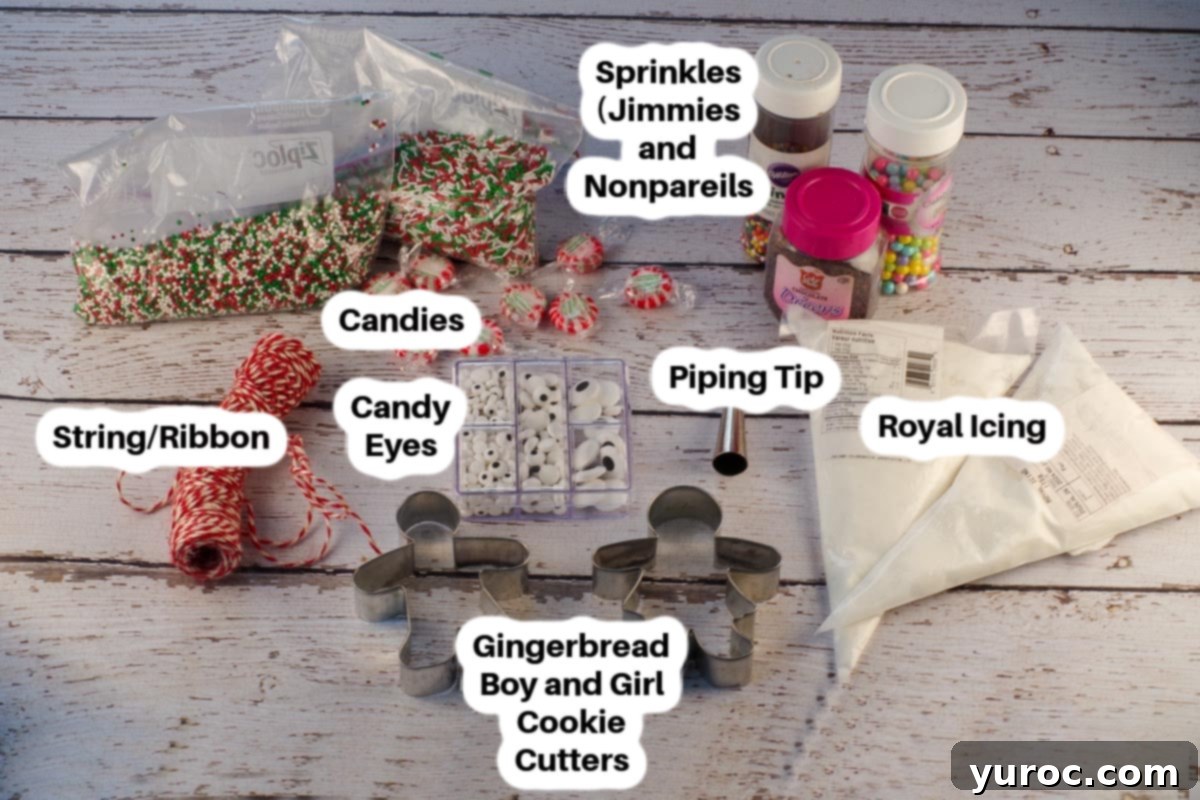
- Candy Eyes: While optional, candy eyes are a fantastic shortcut for decorating, especially when working with children. They instantly add personality to your gingerbread men, reindeers, and other characters, making the decorating process fun and simple.
- Candies for Hugging Gingerbread Men: When creating the adorable hugging gingerbread men, it’s crucial to select hard peppermint candies (like the ones pictured). These candies will not melt in the oven, allowing them to fuse perfectly into the arms of your cookies. They come in a variety of festive colors, adding a lovely touch.
📖 Creative Variations & Simple Substitutions
Get creative with your gingerbread cookies by experimenting with these fun variations and substitutions:
- Sprinkles: The sky’s the limit when it comes to sprinkles! You can use any color and type to customize your cookies. Think classic jimmies, tiny nonpareils, larger dragees (ball sprinkles), or elegant sugar pearls. A festive mix of red, green, and white sprinkles can transform your gingerbread into a holiday masterpiece.
- String or Ribbon for Hanging: If you plan to use your decorated gingerbread men as edible ornaments or festive garlands, don’t forget the string or ribbon! Thread a colorful ribbon through the pre-made holes to hang them beautifully. This adds an extra personal touch and makes them perfect for holiday gifts or decorations.
- Icing Colors: Beyond traditional white royal icing, consider dividing your icing and coloring it with gel food coloring. Green, red, blue, or even gold icing can make your gingerbread creations truly pop and match your holiday theme.
- Nut-Free Option: This recipe is naturally nut-free, making it a safe choice for many holiday gatherings where allergies might be a concern.
🔪How to Make These Speedy No-Chill Gingerbread Cookies
One of the best features of this gingerbread cookie dough is that it genuinely requires no chilling – you don’t even need a hand mixer! It’s designed for maximum ease and efficiency, making it perfect for novice bakers and little hands alike.
PREP WORK: Begin by preheating your oven to 350 degrees F (175 degrees C). This ensures the oven is at the correct temperature as soon as your cookies are ready to bake, contributing to their even cooking and perfect texture. Prepare your baking sheets by lining them with parchment paper if desired; while the recipe states “ungreased,” parchment paper ensures easy cleanup and prevents sticking.
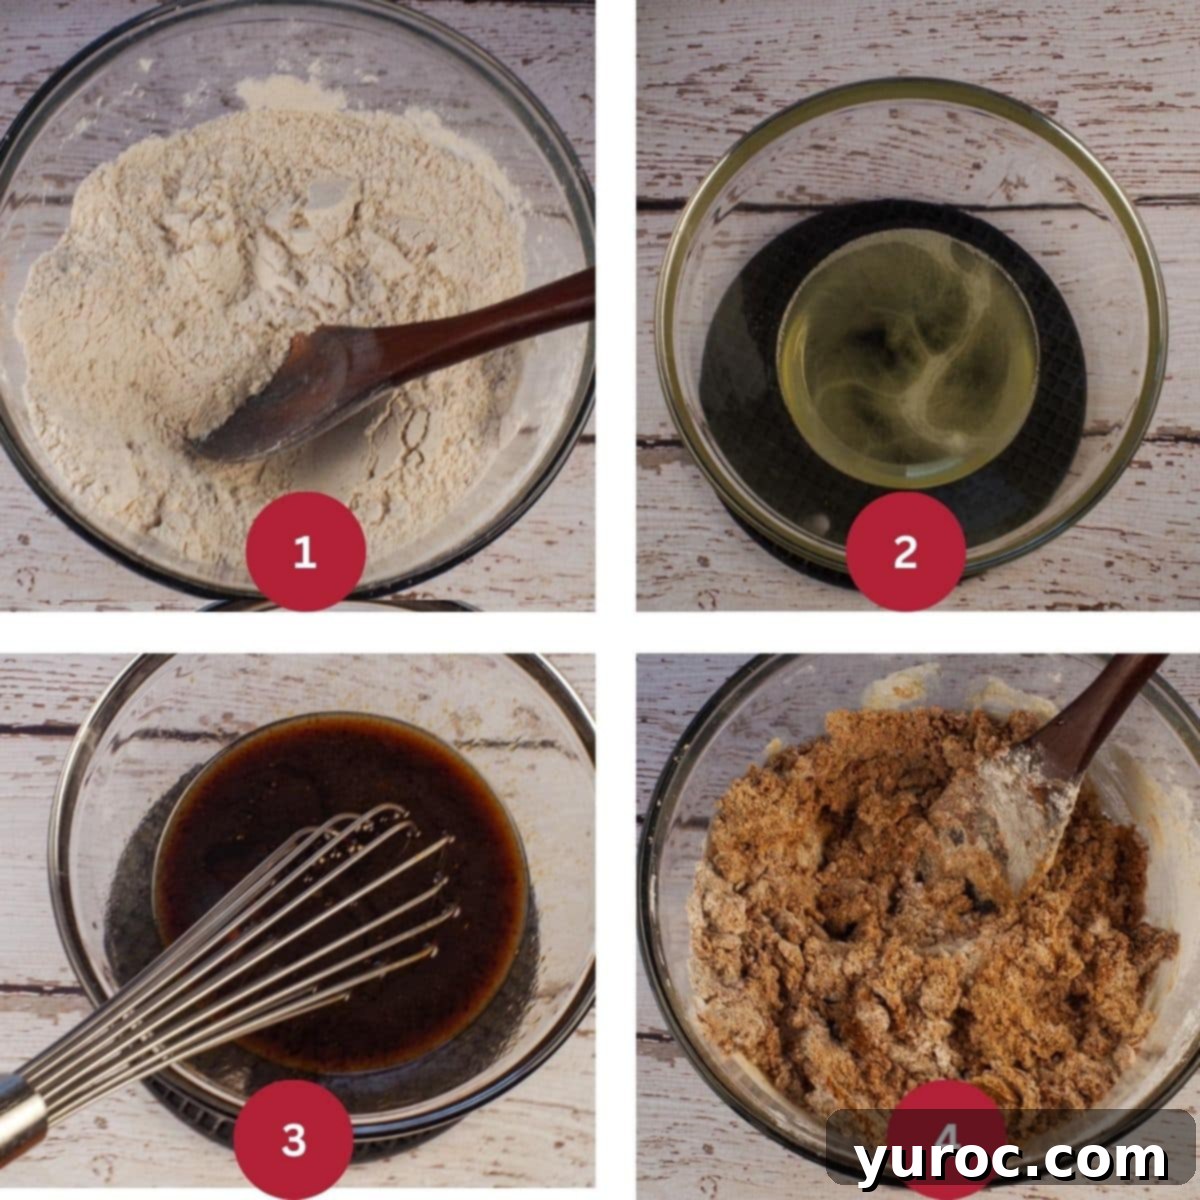
MAKE THE DOUGH – THE MICROWAVE METHOD: First, in a large mixing bowl, combine all your dry ingredients: flour, baking soda, salt, ground cinnamon, and ground ginger. Whisk them thoroughly to ensure the spices and leavening agents are evenly distributed throughout the flour (Image 1). In a separate microwave-safe bowl, melt the vegetable shortening. This usually takes about 45 seconds to 1 minute, depending on your microwave’s power. Watch it carefully to ensure it melts completely but doesn’t overheat (Image 2). Once melted, whisk the brown sugar, molasses, and the beaten egg into the warm shortening. Continue whisking until the mixture is completely smooth and well combined (Image 3). Finally, gradually add the dry flour mixture into the wet ingredients, mixing with a sturdy spoon. Initially, it will be easy to stir, but as the dough comes together, it will become quite stiff, making it difficult to continue with a spoon (Image 4).
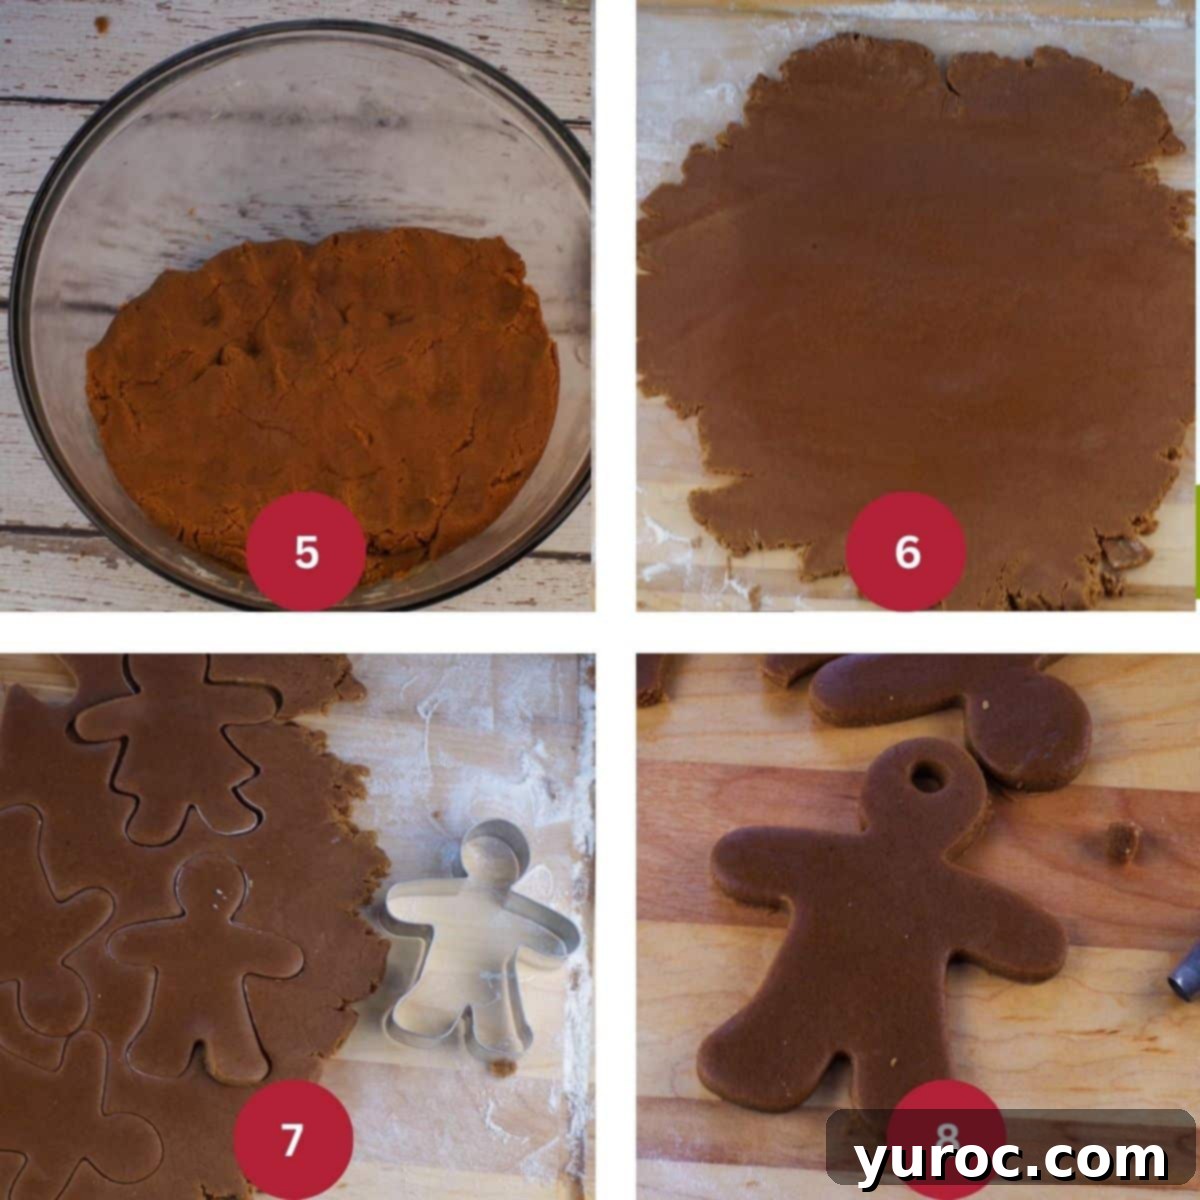
ROLL AND CUT YOUR COOKIES: Once the dough becomes too stiff for a spoon, it’s time to get your hands dirty! Use your hands to finish mixing the dough, bringing it together into a cohesive ball (Image 5). Lightly flour your work surface and a rolling pin. Roll the gingerbread cookie dough out to an even thickness of about ⅛ inch. Consistency in thickness is important for even baking (Image 6). Use your favorite cookie cutters – whether it’s a classic gingerbread man, a gingerbread girl, or other festive shapes – to cut out your cookies (Image 7). If you plan to hang your decorated gingerbread creations, now is the time to make a small hole at the top of each cookie using a piping tip or a similar small, round object (Image 8). Remember, plan your designs *before* baking to incorporate any special features like holes or candies.
**It’s crucial to decide which specific cookie designs you are making (e.g., hanging ornaments, hugging gingerbread men) BEFORE BAKING so you can create holes or add candies at this stage. This ensures your decorations are seamlessly integrated.

MAKE THE CUTOUTS AND PREPARE FOR BAKING: Carefully transfer your cut-out cookies to an UNGREASED cookie sheet. Using a thin spatula can help prevent distortion during transfer (Image 9). This versatile gingerbread man cookie recipe allows for various creative designs, even with a single cookie cutter! Encourage kids to explore: a standard gingerbread man can be turned upside down to become an adorable gingerbread reindeer. For a dancing girl, simply use a gingerbread girl cookie cutter (a large one is ideal, though a small one works too) to cut out the shape, then trim off the legs and make two small holes above where the legs were, resembling arms for a ribbon. If you’re making a hugging gingerbread man, place a hard peppermint candy on the gingerbread man’s chest before baking, then gently fold his arms over the candy. Don’t worry if an arm breaks; you can easily “glue” it back on with a tiny bit of water before baking or a dab of royal icing after. No one will ever notice! (Image 10).

BAKE AND COOL YOUR MASTERPIECES: Bake the cookies for 8-10 minutes. Keep an eye on them; they are done when the edges are lightly browned and the bottom feels firm (Image 11). Baking time can vary slightly depending on your oven and the thickness of your cookies. Once baked, allow the cookies to cool on the baking sheet for 3-5 minutes before carefully transferring them to a wire rack to cool completely (Image 12). Cooling completely is essential before decorating to prevent your icing from melting or smudging.

DECORATE YOUR DELIGHTFUL COOKIES: Once fully cooled, it’s time for the most fun part – decorating! Use royal icing and an assortment of sprinkles to bring your gingerbread characters to life. Here’s how to create the designs pictured:
Rudolph the Gingerbread Man: This clever design is simply a gingerbread man turned upside down! After rolling out, cutting, and baking your gingerbread men, let them cool completely. Using a Ziploc bag with a tiny corner snipped off (or a piping bag with a small round tip) filled with white frosting, pipe a small dot where you want Rudolph’s nose to be, then gently press a red candy (or any color you prefer) onto it. Add two more small dots for eyes and adhere candy eyes. To create antlers, pipe squiggly lines starting from between his eyes and extending up what would normally be the legs of the gingerbread man (Image 13). This creates a festive and easily recognizable reindeer!
Hugging Gingerbread Man Cookies: Roll your cookie dough on a lightly floured surface and cut out gingerbread men. Place them onto a baking sheet. Before baking, position a hard peppermint candy on each gingerbread man’s chest. Carefully fold the gingerbread man’s arms over the candy, gently pressing them into place. If an arm breaks, don’t panic – a little water or a dab of raw dough can “glue” it back before baking. Bake as instructed. Once cooled, you can decorate these sweet huggers with simple details or royal icing as desired (Image 14).
Dancing Gingerbread Girl: For this charming design, roll out your cookie dough on a well-floured surface. Cut out gingerbread girls using a large gingerbread girl cookie cutter (affiliate link for reference, though a smaller one works too). Then, using a small, sharp knife, carefully cut off the legs of the cookie. Next, create two finger-sized holes just above where the legs were, using the back of a piping tip or a small, round cutter. These holes will be for the “arms.” Carefully transfer the modified cookie shapes to a baking sheet and bake. Once cooled, decorate your dancing gingerbread girls with vibrant royal icing for clothing and facial features. You can even tie a ribbon through the armholes for a true “dancing” effect! VIDEO: WATCH The DancingGingerbreadCookie Girl Video HERE
Expert Tips for Gingerbread Success
Achieve gingerbread perfection with these insider tips and tricks:
- Cutting cookies cleanly: For crisp, well-defined cookie shapes, proper cutting technique is essential. When using cookie cutters, press down firmly into the dough, then gently twist or wiggle the cutter slightly. This motion helps to create a clean separation from the surrounding dough. If you notice any excess dough clinging to the edges after lifting the cutter, you can use a small paring knife to carefully trim it away either before or immediately after baking, ensuring your cookies look sharp and professional.
- Dough consistency issues: The perfect gingerbread dough should be pliable and easy to work with, not too sticky or too crumbly. If your dough feels too wet and sticky, gradually incorporate a small amount of additional all-purpose flour, a tablespoon at a time, until it reaches the desired non-sticky consistency. Conversely, if your dough is too dry and crumbly, it might need a touch more moisture. In this case, gradually add a little more melted vegetable shortening, a teaspoon at a time, until the dough becomes smooth and cohesive. Always mix thoroughly after each addition to assess the texture.
- Utilize Ziploc bags for kid-friendly decorating: When baking with a large group of children, practicality is key. For my Girl Guides group of 25, having individual piping bags with tips wasn’t feasible. Instead, we found that Ziploc bags were an excellent solution. Simply fill a sandwich-sized Ziploc bag with royal icing, seal it, and snip a tiny corner off the bottom to create an impromptu piping bag. This method is mess-free, disposable, and perfectly manageable for little hands.
- Pre-made royal icing convenience: Making royal icing from scratch can be time-consuming. If you’re short on time or prefer a simpler approach, remember that royal icing is often available for purchase. You can find it in tubs at most craft or baking supply stores, and sometimes even pre-filled in piping bags, ready to use. This can significantly cut down on prep time and allow you to jump straight into the fun part: decorating! For my preferred homemade recipe, check out my royal icing recipe.
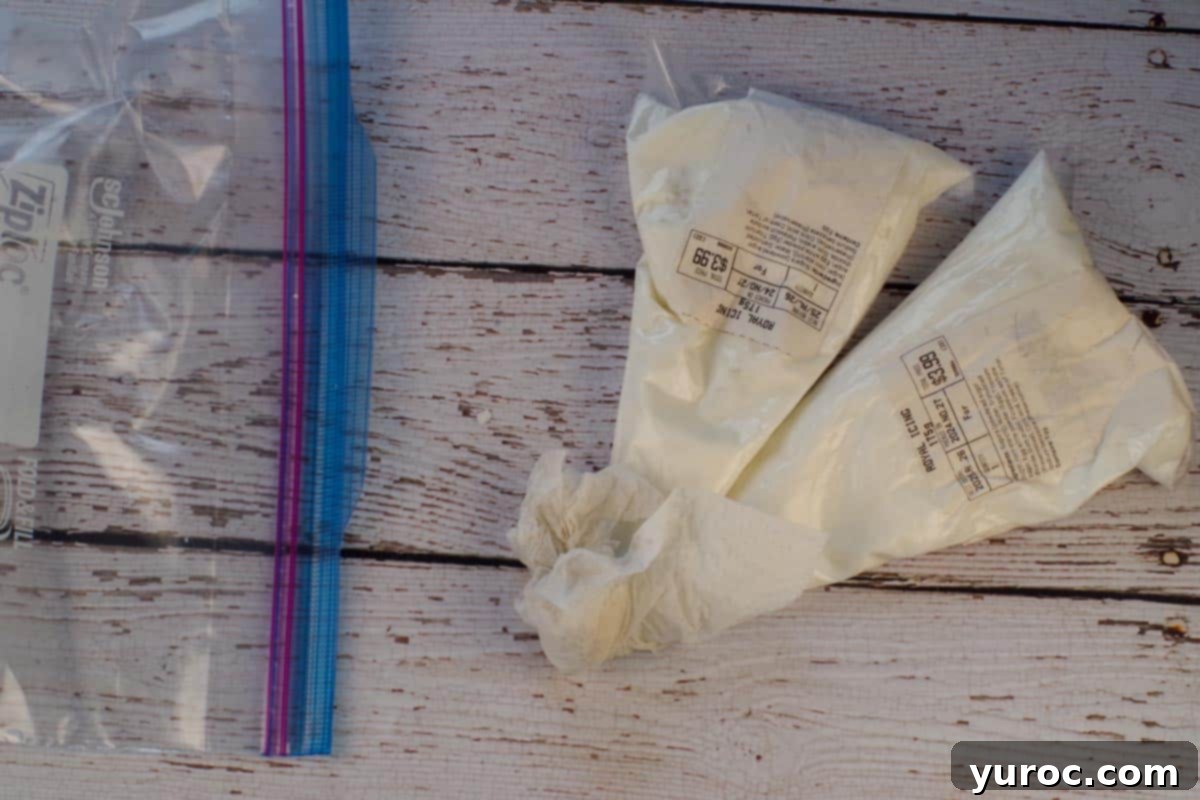
- Keep royal icing sealed and tips damp: Royal icing is notorious for hardening very quickly when exposed to air. To prevent this, always keep any unused royal icing in an airtight container or a tightly sealed Ziploc bag. If you’re using piping bags, wrap the tips or ends with a damp paper towel before placing the entire bag into a Ziploc and refrigerating. This helps maintain the icing’s smooth consistency. Even while actively decorating, keep a damp cloth nearby to periodically wipe and cover your piping tips. This simple step prevents clogging and ensures a continuous flow of icing. (These were essential instructions I provided to all the kids during our baking activity).
- “Glue” cookie pieces back together with royal icing: Don’t despair if a cookie accidentally breaks or gets dropped! Royal icing acts as a fantastic edible adhesive. Simply apply a small amount of icing to the broken edges and gently press the pieces back together. Once the icing hardens, your cookie will be as good as new, making this recipe incredibly forgiving, especially when baking with enthusiastic children.
- Easily fix decorating mistakes: Everyone makes mistakes, especially when decorating! If you or a child makes an error with royal icing, don’t worry. Simply wipe off the wet icing with a clean finger or a small utensil. Then, use a damp paper towel to gently clean away any residue from the cookie surface. Allow the cookie to air dry for a minute or two, and you’ll have a clean canvas to start decorating again. This trick works wonderfully and saves many cookies from being discarded (I even used this trick for the photo below when making a small correction).

Speaking of icing, the royal icing recipe I recommend is the very same one I use for assembling my intricate gingerbread houses. It provides the perfect balance of firmness and workability.
While this no-chill gingerbread recipe produces sturdy cookies that could certainly be used for building small gingerbread houses, if your aspirations lean towards creating a grand, large-scale gingerbread structure, I strongly advise using the specialized gingerbread recipe for large houses detailed in that dedicated post. That recipe is formulated for maximum structural integrity.
These resilient gingerbread cookies are absolutely perfect for decorating with children of all ages, even preschoolers! Their robust texture means they can withstand accidental drops and handling, and any decorating mishaps are easily remedied with a bit of our strong royal icing (check out my recipe for details). Best of all, they taste absolutely incredible, striking the ideal balance of warmth, spice, and sweetness that makes them a universally loved holiday treat.
👪 Serving Size & Group Baking Tips
This recipe yields approximately 20 medium-sized cookies, making it ideal for small groups. When I hosted the Girl Guides activity, I divided the girls into groups of 3-4, and each group made their own batch of dough. We had three leaders on hand to provide support and guidance. At 10 years old, the girls were quite capable of handling the mixing and microwaving steps independently. We organized an efficient “assembly line” system, with leaders overseeing the ovens to manage cookies going in and out. Impressively, we were able to complete the entire process – from mixing to decorating – for all groups in just under two hours, despite having only one oven!
🌡️Storage Instructions for Freshness
Proper storage ensures your delicious gingerbread cookies stay fresh and delightful for longer:
Room Temperature/Fridge: Once baked and decorated, these cookies can be stored at room temperature in an airtight container for approximately two weeks. For slightly longer freshness, or if your home is particularly warm, you can also store them in the refrigerator, where they will keep well for about two weeks.
Freezer: These gingerbread cookies freeze exceptionally well! You can freeze the baked and decorated cookies for up to six months in an airtight freezer-safe container. To freeze the dough, wrap it tightly in plastic wrap and then place it in a freezer bag or container; it will keep for up to three months. When ready to bake, simply thaw the dough in the refrigerator overnight before rolling and cutting. For more detailed tips on storing gingerbread cookies, you can read HERE.
❔ Frequently Asked Questions About This Recipe
Cookie dough is typically chilled to prevent cookies from spreading excessively in the oven, especially when using butter-based recipes. Chilling solidifies the butter, which helps the cookies hold their shape. However, this no-chill gingerbread cookie recipe uses vegetable shortening instead of butter. Shortening has a higher melting point and creates a firmer dough that is less prone to spreading. Additionally, the recipe contains a higher proportion of dry ingredients, which further contributes to a sturdy, no-spread cookie that maintains its intricate cut-out shapes perfectly. This unique formulation results in a strong, firm, and wonderfully dry cookie without any waiting time!
Absolutely! These cookies are excellent for freezing. You can freeze the baked and cooled cookies for up to three months in an airtight container. If you prefer to prepare ahead, you can also freeze the unbaked dough for up to three months. Simply thaw the dough in the refrigerator before rolling, cutting, and baking as instructed.
What I found truly interesting during our Girl Guides activity was the girls’ decorating preferences. Despite offering a variety of creative options, most of them gravitated towards the traditional Christmas gingerbread man! A few chose to make the adorable hugging gingerbread man and the festive gingerbread reindeer, but surprisingly, none of the girls chose the dancing gingerbread girl.
Initially, I admit, I was a little disappointed because the dancing gingerbread girl was the design I was most excited to demonstrate. But that’s the wonderful thing about working with kids – you never truly know what will capture their imagination. And that’s precisely why I always make sure to give them plenty of options!
No matter which gingerbread cookie design you choose to create, and whether you’re baking with one child or a whole group, this simple and forgiving gingerbread cookie recipe is truly the perfect choice for a fun, engaging, and delicious baking experience with kids of all ages!
If you love gingerbread as much as we do, be sure to try these delightful Gingerbread Almond Snowball Cookies and these festive Gingerbread Yule Log cookies!
🎄More Easy Christmas Cookie Recipes and Treats to Make with Kids!
- Christmas Nougat (with jujubes)
- Gingerbread Almond Snowball Cookies
- Raspberry Jam Cookies (Classic Thumbprint)
- Microwave Sugar Cookie Fudge Recipe
Did your family❤️this recipe? Did you know that commenting and⭐rating recipes is one of the best ways to support your favorite recipe creators? If you LOVED this recipe, please comment and rate it in the recipe card below or share photos on social media using the hashtag #foodmeanderings or tagging @foodmeanderings!


📋Quick & Easy No-Chill Gingerbread Cookie Recipe
Equipment
- baking sheet
- gingerbread girl cookie cutters
- gingerbread man cookie cutters
- Rolling Pin
Ingredients
- 3 ¼ cups all purpose flour
- ½ teaspoon baking soda
- ¼ teaspoon salt
- 1 teaspoon ground cinnamon
- ½ tablespoon ground ginger
- ½ cup vegetable shortening
- ½ cup brown sugar *use light or dark brown sugar
- ⅔ cup molasses
- 1 egg beaten
Decorations
- royal icing
- sprinkles
- peppermint candies
- candy eyes
- ribbon
Instructions
- Preheat your oven to 350 degrees F (175 degrees C).
- In a large mixing bowl, thoroughly blend together the all-purpose flour, baking soda, salt, ground cinnamon, and ground ginger.3 ¼ cups all purpose flour, ½ teaspoon baking soda, ¼ teaspoon salt, 1 teaspoon ground cinnamon, ½ tablespoon ground ginger
- In a separate microwave-safe bowl, melt the vegetable shortening. This typically takes around 45 seconds to 1 minute in the microwave.½ cup vegetable shortening
- Whisk the brown sugar, molasses, and beaten egg into the melted shortening until the mixture is fully incorporated and smooth.½ cup brown sugar, ⅔ cup molasses, 1 egg
- Add the dry flour mixture to the wet ingredients. Mix with a spoon until the dough becomes too stiff to continue stirring by hand.
- Use your hands to finish mixing the dough, bringing it together into a smooth ball.
- On a lightly floured surface, roll out the cookie dough to an even thickness of about ⅛ inch.
- Cut cookies into your desired shapes using cookie cutters. Carefully place them onto UNGREASED cookie sheets.
- Bake for 8-10 minutes, or until the edges are lightly browned and the bottoms are firm.
- Allow the cookies to cool on the baking sheet for 3-5 minutes before transferring them to a wire rack to cool completely.
- Once completely cool, decorate your cookies with royal icing and sprinkles. Refer to the “How to Make” section above for detailed instructions on creating various gingerbread designs, as shown in the photos!royal icing, sprinkles, peppermint candies, candy eyes, ribbon
Notes
Create this adorable character by simply turning a baked gingerbread man cookie upside down! Once cooled, use a Ziploc bag (with a tiny corner snipped) or a piping bag filled with white frosting. Pipe a small dot for Rudolph’s nose, then attach a red candy. Add two small dots for eyes, then place candy eyes. For the antlers, pipe squiggly lines starting from between his candy eyes and extending up the “legs” of the upside-down gingerbread man, as shown in the recipe photos. Hugging Gingerbread Man Cookies:
Roll out your gingerbread cookie dough on a well-floured surface and cut out several gingerbread men shapes. Carefully place these on a cookie sheet. Position a hard peppermint candy (ensure it’s hard candy that won’t melt) onto the gingerbread man’s chest area. Gently fold his arms over the candy, lightly pressing them to adhere. Bake these cookies according to the recipe instructions. Once cooled, you can decorate them further with royal icing as desired, adding facial features and clothing. Dancing Gingerbread Girl:
To create this charming dancing figure, roll out your cookie dough on a well-floured surface. Use a large gingerbread girl cookie cutter (affiliate link for convenience) to cut out the shapes. Next, carefully cut off the legs of the gingerbread girls with a small, sharp knife. Then, using the back of a pastry tip or a similar small, round tool, create two finger-sized holes just above where the legs were, which will serve as points for ribbon “arms.” Gently transfer these modified cookies onto a baking sheet and bake. Once cooled, decorate your dancing gingerbread girls with colorful royal icing and sprinkles to bring them to life. Expert Tips for Perfect Gingerbread:
-
- Clean Cookie Cuts: When using cookie cutters, press firmly into the dough, then gently twist to ensure a clean edge. If any excess dough remains, use a small paring knife to carefully trim it before or after baking for pristine shapes.
-
- Dough Adjustments: If your dough is too wet and sticky, gradually add a tablespoon of flour until it’s manageable. If it’s too dry and crumbly, slowly mix in a teaspoon of melted shortening until the consistency is just right.
-
- Kid-Friendly Decorating: For group activities, Ziploc bags with a snipped corner make excellent disposable piping bags, perfect for small hands and minimizing mess.
-
- Store-Bought Icing: Save time by purchasing pre-made royal icing in tubs or pre-filled piping bags if you prefer not to make it from scratch.
-
- Icing Preservation: Royal icing dries quickly. Keep unused icing sealed in an airtight container or a Ziploc bag in the fridge, and cover piping tips with a damp paper towel to prevent hardening.
- Cookie Repair: Broken cookies are no problem! Royal icing acts as a strong edible glue. Simply apply a small amount to the broken edges and press pieces together.
- Mistake Correction: If a decorating error occurs, gently wipe off the wet icing, clean the residue with a damp paper towel, let the cookie dry briefly, and start again.
