Delightful Mini Egg Cupcakes: Your Ultimate Guide to Easy Easter Treats
Easter brings with it a host of delightful traditions, and for many, one of the most cherished is the abundance of delicious candy. Among these, mini eggs hold a special place, marking the true start of spring celebrations. If you’re anything like me, you simply can’t get enough of their sweet, crunchy charm and are always looking for new ways to incorporate them into festive treats. These easy-to-make Mini Egg Cupcakes are an absolute must for your Easter festivities. They’re not just any cupcake; they’re a miniature Easter egg hunt, beautifully captured in a frosted, bite-sized dessert, guaranteed to bring joy to everyone’s face.
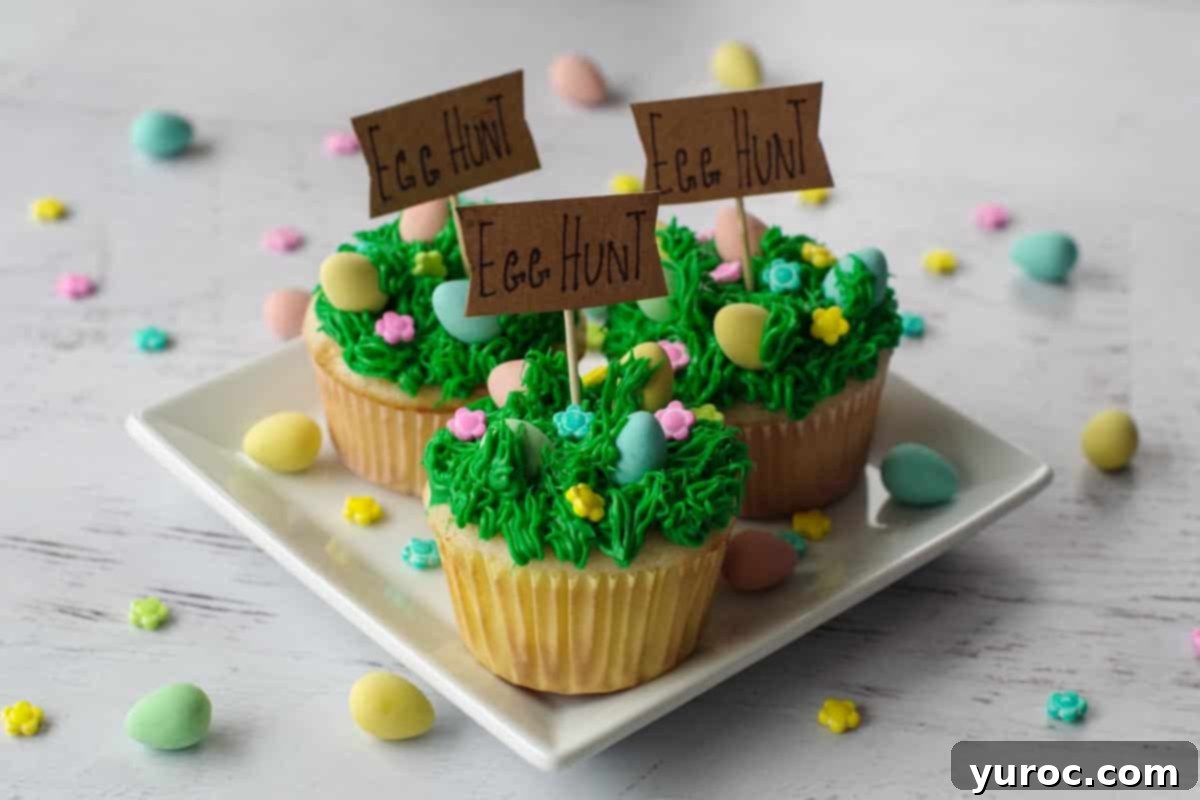
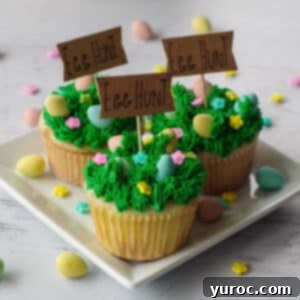
These adorable Mini Egg Cupcakes have quickly become a staple for Easter gatherings, drawing inspiration from other festive creations like my popular Easter Creme Egg Chocolate Swiss Roll. Imagine serving these vibrant, fun cupcakes at your Easter celebration – they make for an unforgettable dessert or a wonderful surprise for family and friends. Their charming “egg hunt” design, complete with luscious green grass frosting and hidden chocolate mini eggs, is sure to elicit smiles and delight, making your holiday extra special.
For those who share my unwavering love for mini eggs, you’ll be thrilled to discover another fantastic recipe: my Microwave Easter Egg Fudge. It’s another quick and easy way to enjoy the beloved candy in a different, equally decadent form, perfect for rounding out your holiday dessert table.
🥕 Essential Ingredients for Your Mini Egg Cupcakes
Crafting these festive Mini Egg Cupcakes requires a few simple yet key ingredients. The beauty of this recipe lies in its flexibility, allowing you to choose between homemade components or convenient store-bought options, depending on your time and preference. Here’s a detailed look at what you’ll need to create this delightful Easter treat:
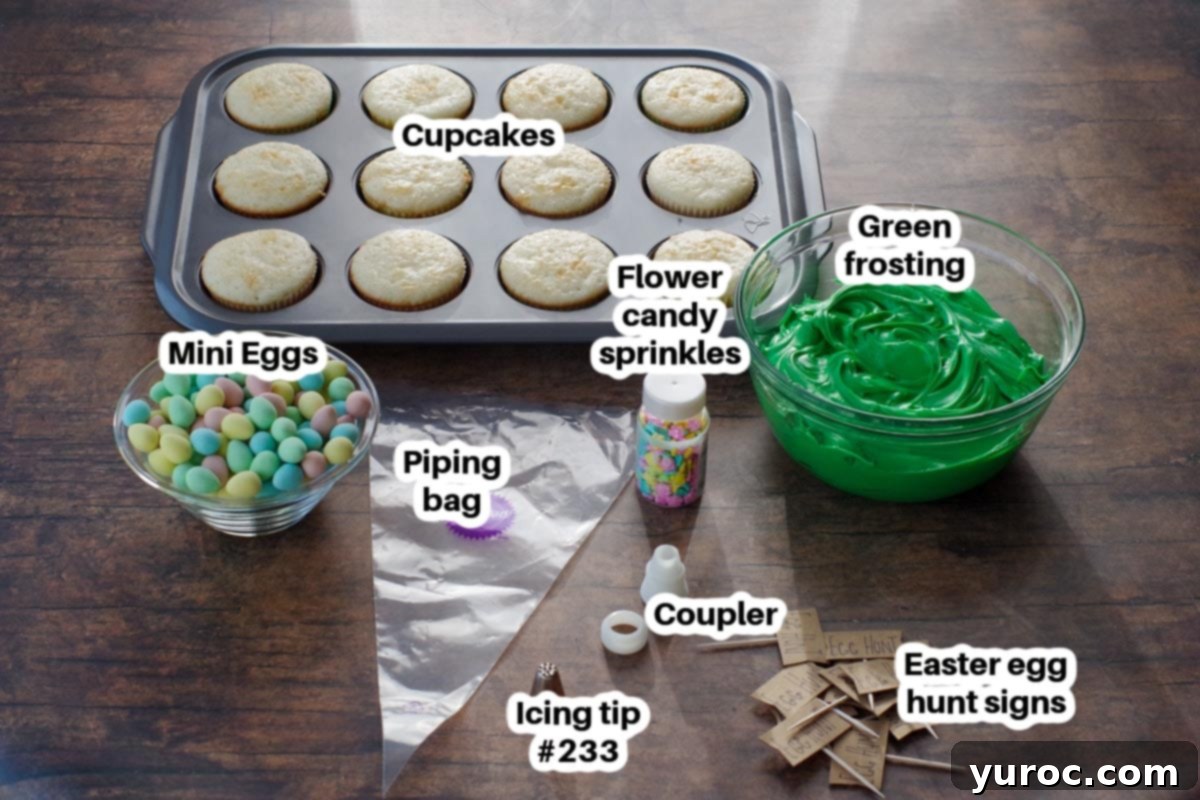
- Cupcakes: The foundation of our Easter treat! For ultimate ease and consistent results, I often opt for a high-quality vanilla cake mix, such as Duncan Hines. A standard box mix typically yields about 24 cupcakes. You can either bake and decorate all of them, or freeze half of the unfrosted cupcakes for future use. Alternatively, if you prefer to make everything from scratch, a classic homemade vanilla cupcake recipe works perfectly. For a chocolatey twist, consider using chocolate cake mix or your favorite homemade chocolate cupcake recipe.
- Flower-shaped Candy Cupcake Sprinkles (affiliate link): These charming sprinkles add a touch of spring whimsy to your “egg hunt” scene. They are usually available in the baking aisle of larger grocery stores, specialty craft stores (like Michaels), or conveniently online. Look for bright, pastel colors to enhance the festive Easter theme. If you can’t find flower shapes, small butterfly or bunny sprinkles would also be adorable alternatives.
- Frosting (Vanilla/White): A smooth, creamy frosting is crucial for piping the “grass” effect. While homemade buttercream or cream cheese frosting offers a superior flavor and texture, a store-bought whipped vanilla or fluffy white frosting (like Betty Crocker’s Whipped Fluffy White, which I frequently use) provides excellent convenience without compromising on taste or pipe-ability. Ensure it’s white or vanilla-flavored to allow the green food coloring to truly shine.
- Green Food Coloring: To achieve that vibrant, realistic “grass” look, gel food coloring is highly recommended. Unlike liquid food coloring, gel versions provide a much deeper, more concentrated color with only a tiny amount, preventing the frosting from becoming runny. I suggest vibrant shades like Kelly green or Leaf green. Reputable brands such as Wilton, Americolor, or Satin Ice are excellent choices for their quality and color intensity.
- Chocolate Mini Eggs: The stars of our Easter egg hunt! Cadbury Mini Eggs are the classic choice, beloved for their crisp candy shell and solid milk chocolate interior. Their speckled appearance adds to the authentic egg hunt aesthetic. You’ll want enough to place several on each cupcake, creating the illusion of freshly discovered treasures.
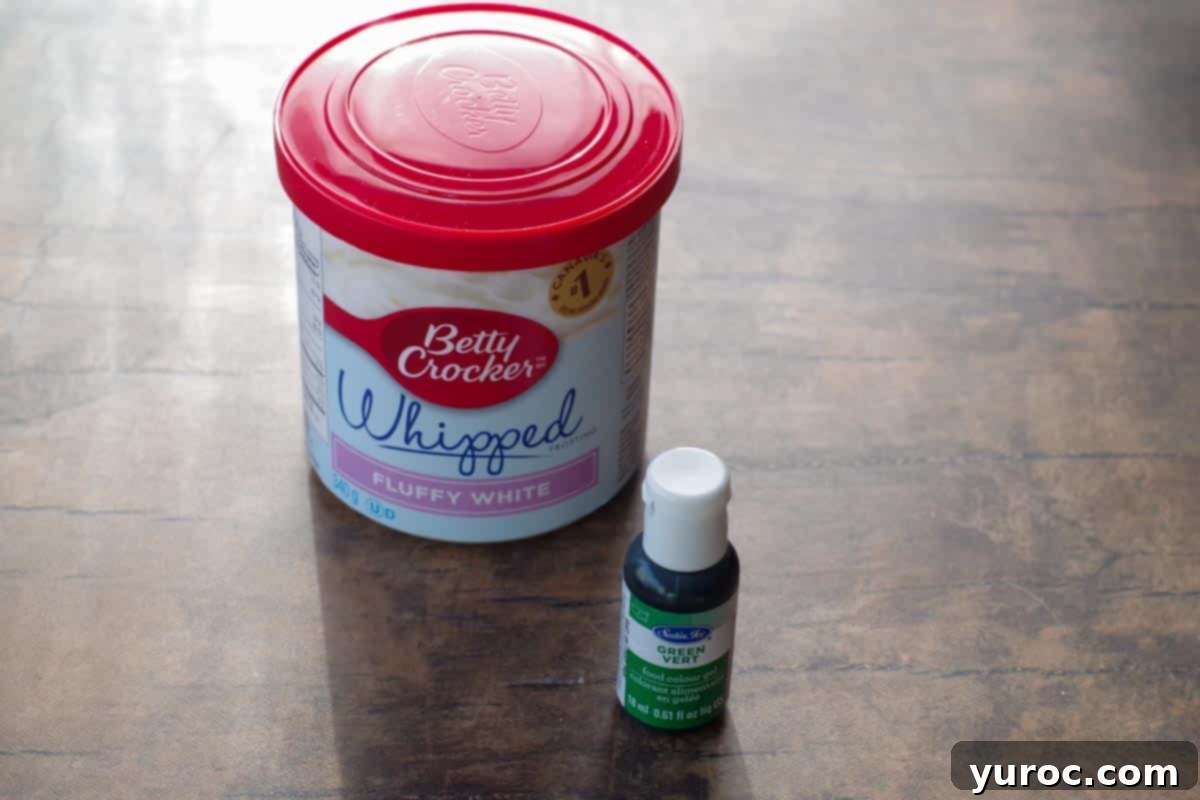
For my batch, I typically use two containers of Betty Crocker whipped fluffy white frosting, which, when combined with approximately ½ teaspoon of green gel food coloring, yields the perfect grassy shade and consistency. The amount of food coloring can be adjusted to achieve your desired depth of green.
*See the recipe card at the bottom of this post for a full list of ingredients and precise quantities.
📖 Variations & Substitutions for Your Easter Cupcakes
One of the best things about baking is the ability to customize a recipe to suit your taste, dietary needs, or what you have on hand. These Mini Egg Cupcakes are no exception! Here are several ideas for variations and substitutions to make this Easter treat uniquely yours:
- Cupcake Base:
- Convenience First: For the quickest route, simply buy unfrosted vanilla cupcakes from your local grocery store bakery. This saves a significant amount of time and is perfect for busy schedules.
- Box Mix Brilliance: As mentioned, a vanilla cake mix is a fantastic semi-homemade option, offering consistent results and ease.
- From Scratch Goodness: If you love baking, prepare your favorite homemade vanilla cupcakes from scratch. This allows for greater control over ingredients and flavor.
- Flavor Swaps: Don’t feel limited to vanilla! Rich chocolate cupcakes make an excellent base, especially when topped with green “grass” frosting and mini eggs. Red velvet, lemon, or even carrot cake cupcakes could also add a delightful twist.
- Dietary Adaptations: For gluten-free guests, use a certified gluten-free cake mix or a trusted gluten-free cupcake recipe. Similarly, dairy-free milk and butter substitutes can be used in homemade recipes.
- Frosting Options:
- Homemade Superiority: Elevate your cupcakes with homemade frosting. A classic American buttercream (butter, powdered sugar, milk/cream, vanilla) is sturdy and pipes beautifully. A shortening-based frosting can be even more stable in warmer temperatures and is excellent for intricate piping work.
- Cream Cheese Frosting: For a tangy counterpoint to the sweet mini eggs, a cream cheese frosting would be divine. Just be aware that it tends to be softer and may require refrigeration, which could slightly firm up the mini eggs.
- Store-Bought Simplicity: Pre-made whipped fluffy white frosting is incredibly convenient and offers a light, airy texture that takes color well.
- Color Creativity: While green is traditional for “grass,” you could experiment with other pastel colors for a whimsical Easter look. Think light blue for a “sky” background, or even pastel pink and purple for a magical spring garden.
- Decorative Embellishments:
- Alternative Candies: If Cadbury Mini Eggs are unavailable or you want more variety, consider using other Easter candies like jelly beans, pastel M&Ms, chocolate-covered almonds, or even small marshmallow chicks and bunnies.
- Different Sprinkles: Beyond flower sprinkles, small bunny, chick, or pastel-colored sugar sprinkles can add to the festive theme. Edible glitter can also give your “grass” a dew-kissed sparkle.
- Edible Flowers: For a more elegant touch, small, edible fresh flowers (ensure they are food-safe!) can be placed on top instead of candy flowers.
- Piping Tips: While the #233 grass tip is ideal for the realistic grass effect, you can still achieve a charming look with other tips. A small star tip (like Wilton 1M or 21) can create pretty rosettes or stars, and a round tip can create smooth swirls.
By experimenting with these variations, you can tailor your Mini Egg Cupcakes to perfectly match your preferences and make them a truly unique highlight of your Easter spread.
🍽️ Equipment You Will Need for Baking and Decorating
Having the right tools makes the process of baking and decorating these Mini Egg Cupcakes much more enjoyable and efficient. Here’s a rundown of the essential equipment you’ll need, from baking the base to crafting the charming “egg hunt” scene:
- Muffin Tin: A standard 12-cup muffin tin is essential for baking your cupcakes. Make sure it’s clean and ready to go!
- Cupcake Liners: These prevent sticking and add a decorative touch. Choose festive Easter-themed liners or simple white ones to let the frosting shine.
- Large Mixing Bowl: You’ll need this for preparing your cupcake batter (if making from scratch or using a mix) and for mixing the frosting with food coloring.
- Electric Mixer: A hand mixer or stand mixer will make quick work of mixing batter and especially for whipping your frosting to the perfect consistency.
- Rubber Spatula: Useful for scraping down the sides of your mixing bowl and transferring batter or frosting.
- Wire Cooling Rack: Crucial for cooling your cupcakes completely before frosting. Warm cupcakes will melt your beautiful green “grass”!
- Piping Bag: Disposable piping bags are convenient, or you can use reusable silicone ones. Ensure they are large enough to hold a good amount of frosting.
- Coupler: This allows you to easily switch between different piping tips without changing piping bags. A standard size is sufficient for most tips.
- Grass Piping Tip (#233): This is the magic tip that creates the realistic grass effect. It has multiple small holes that produce fine strands of frosting, mimicking blades of grass. If you don’t have a #233, a small multi-opening tip might work, but the grass tip is truly best for this specific look.
- Measuring Cups and Spoons: For accurately measuring all your ingredients.
- Small Offset Spatula (Optional): If you’re not piping a smooth base layer of frosting, a small offset spatula can help spread a thin, even layer of green frosting before piping the grass, ensuring full coverage.
Beyond the baking and decorating essentials, you might also want to prepare some charming little “egg hunt” signs to complete the look. You can make your own signs with simple materials or purchase customized ones:
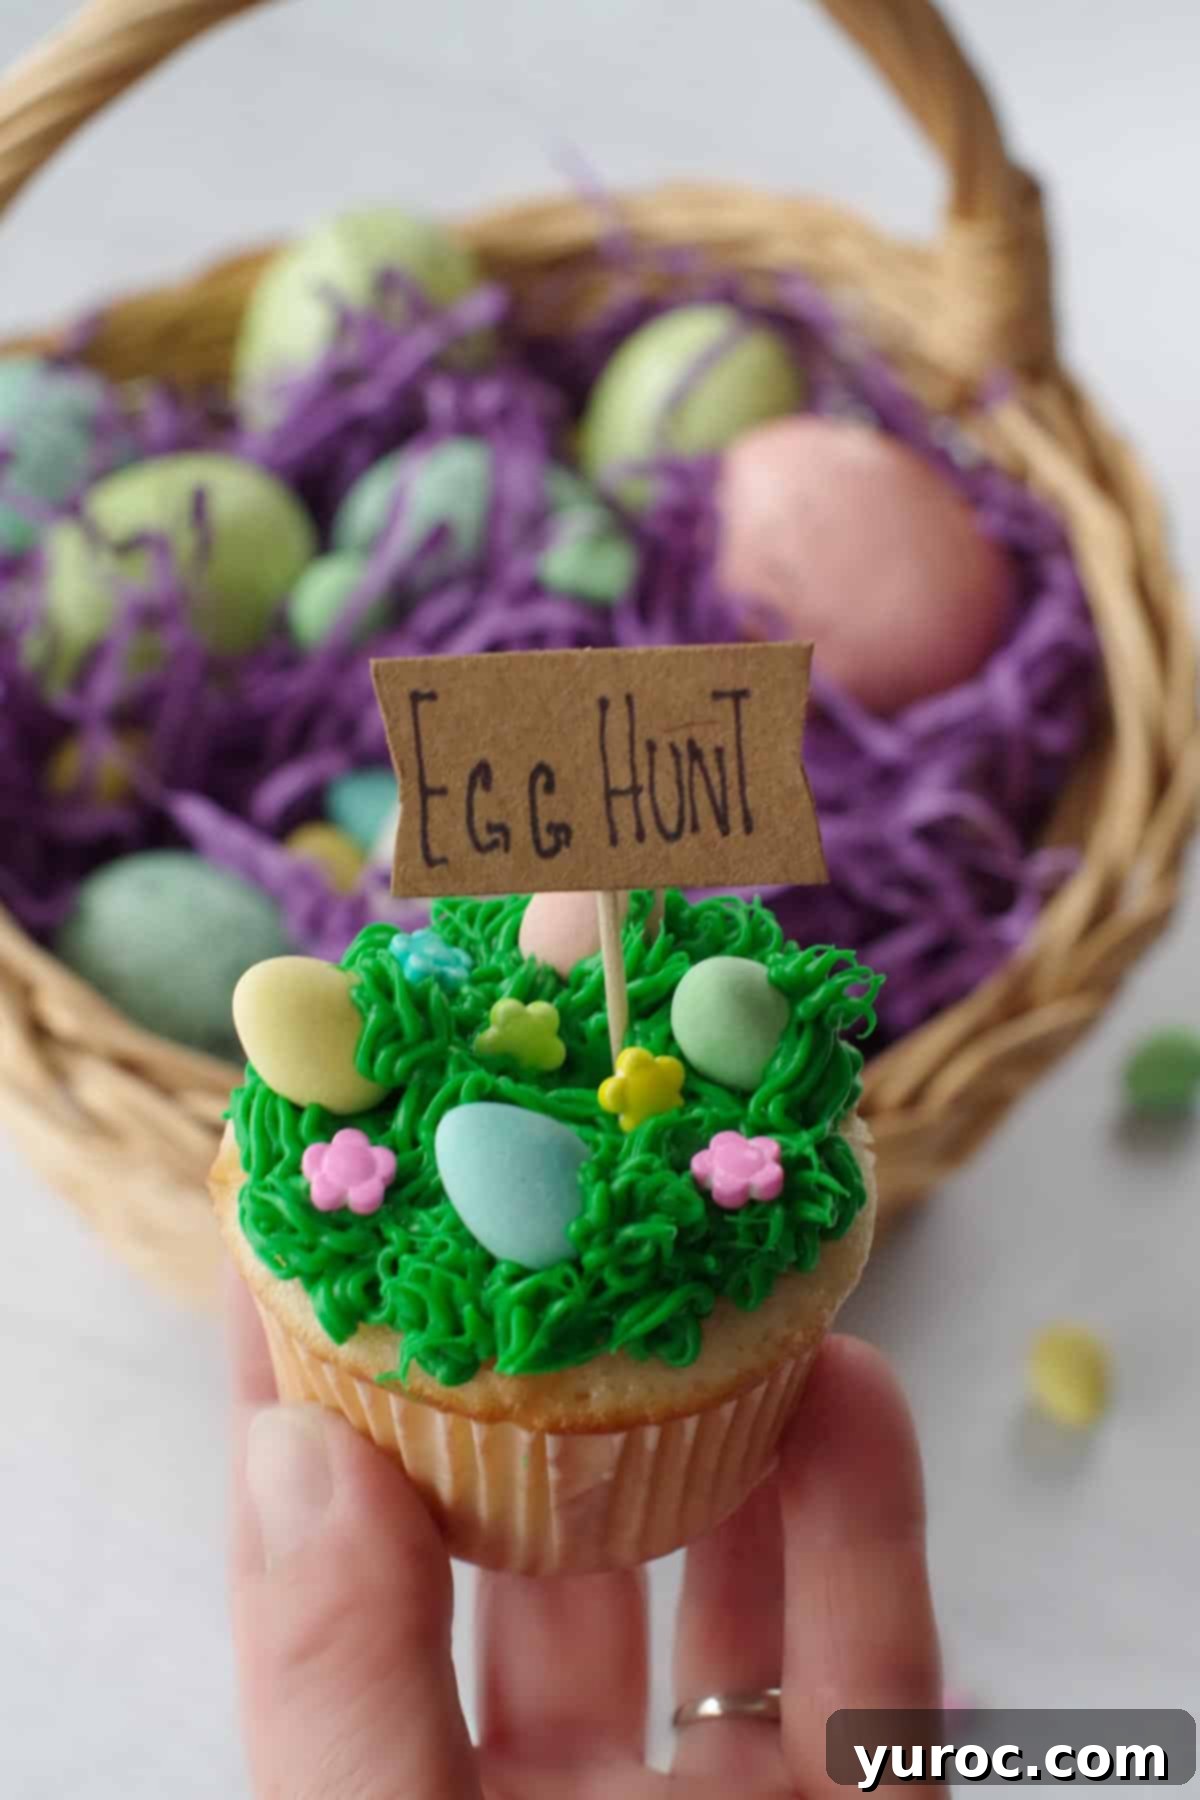
- DIY Signs: My daughter created ours using brown cardstock, a Sharpie, scissors, and toothpicks. She simply wrote little phrases like “EGG HUNT” or “FIND ME!” and taped the toothpicks to the back for easy insertion into the cupcakes. This is a fun, personal touch!
- Purchased Signs: If DIY isn’t your style, you can find lovely customized signs on Etsy that will perfectly complement your Easter theme.
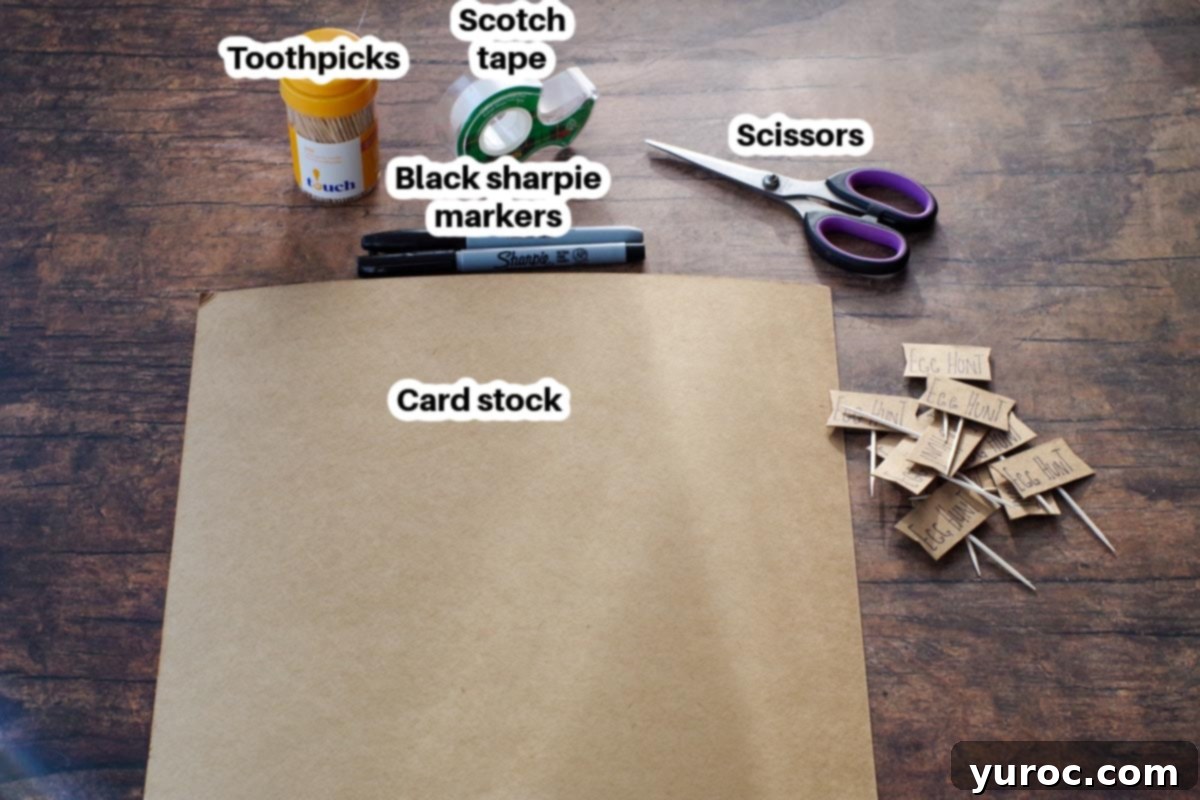
Gathering these items before you begin will ensure a smooth and enjoyable cupcake decorating experience.
🔪 How to Decorate Easter Cupcakes with a Fun Egg Hunt Theme
Creating these charming Mini Egg Cupcakes is a fun and surprisingly simple process. Follow these step-by-step instructions to transform plain cupcakes into an adorable Easter egg hunt scene:
Prep Ahead:
- Bake Cupcakes: Begin by baking your chosen cupcakes (either from scratch or a mix) according to their package or recipe directions. Remember a crucial tip: only fill cupcake liners about ⅔ full with batter. This prevents overflowing and creates a nice, flat surface for frosting. Once baked, allow them to cool completely on a wire rack. This is vital, as warm cupcakes will cause your frosting to melt.
- Prepare Frosting: In a large mixing bowl, combine your vanilla/white frosting with the green gel food coloring. Start with about ½ teaspoon of gel and mix thoroughly with an electric mixer. Continue adding tiny amounts of food coloring, mixing after each addition, until you achieve a vibrant, rich green color that mimics fresh grass.
- Make Signs (Optional): If you’re adding the cute “egg hunt” signs, prepare them in advance. This could be days ahead of time.
Now, let’s get to the fun part – decorating!
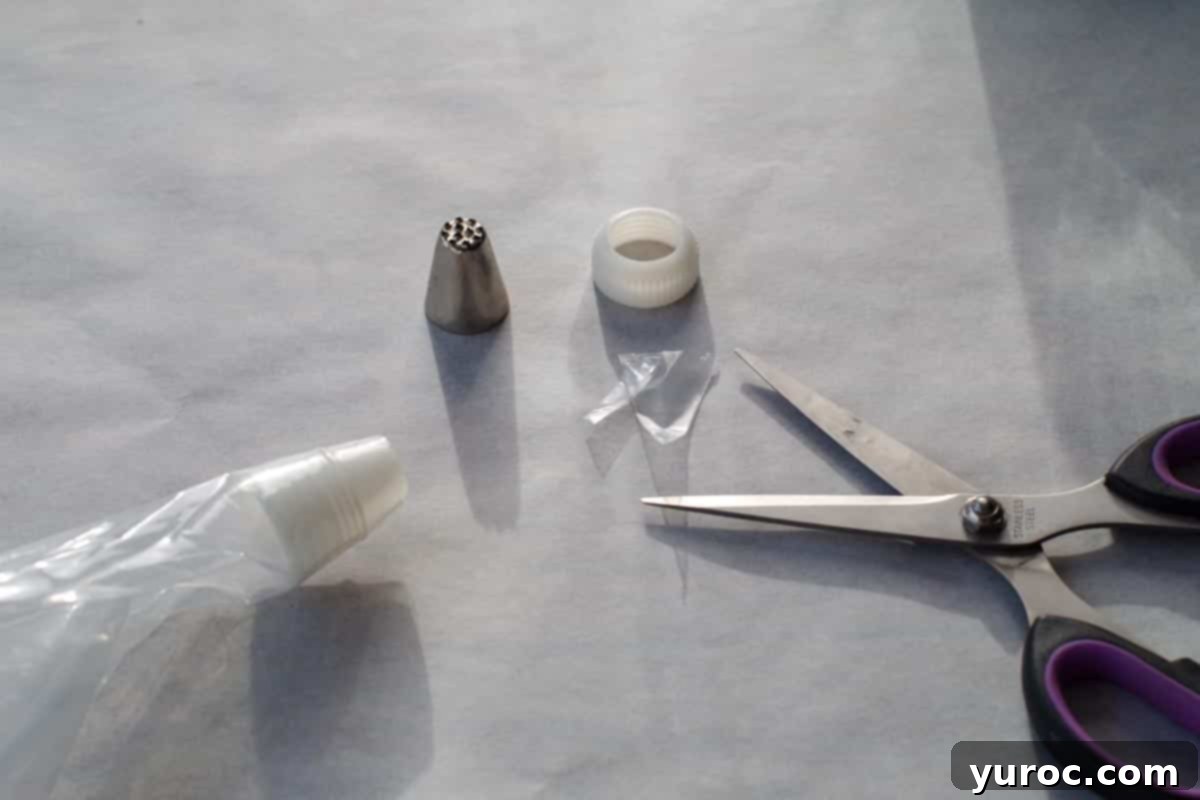
Take your piping bag and insert the coupler through the larger opening, pushing it down so the narrow end pokes out from the pointed end of the bag. Use scissors to carefully snip off the very tip of the piping bag, ensuring the coupler’s narrow end is fully exposed but not too much of the bag is cut off.
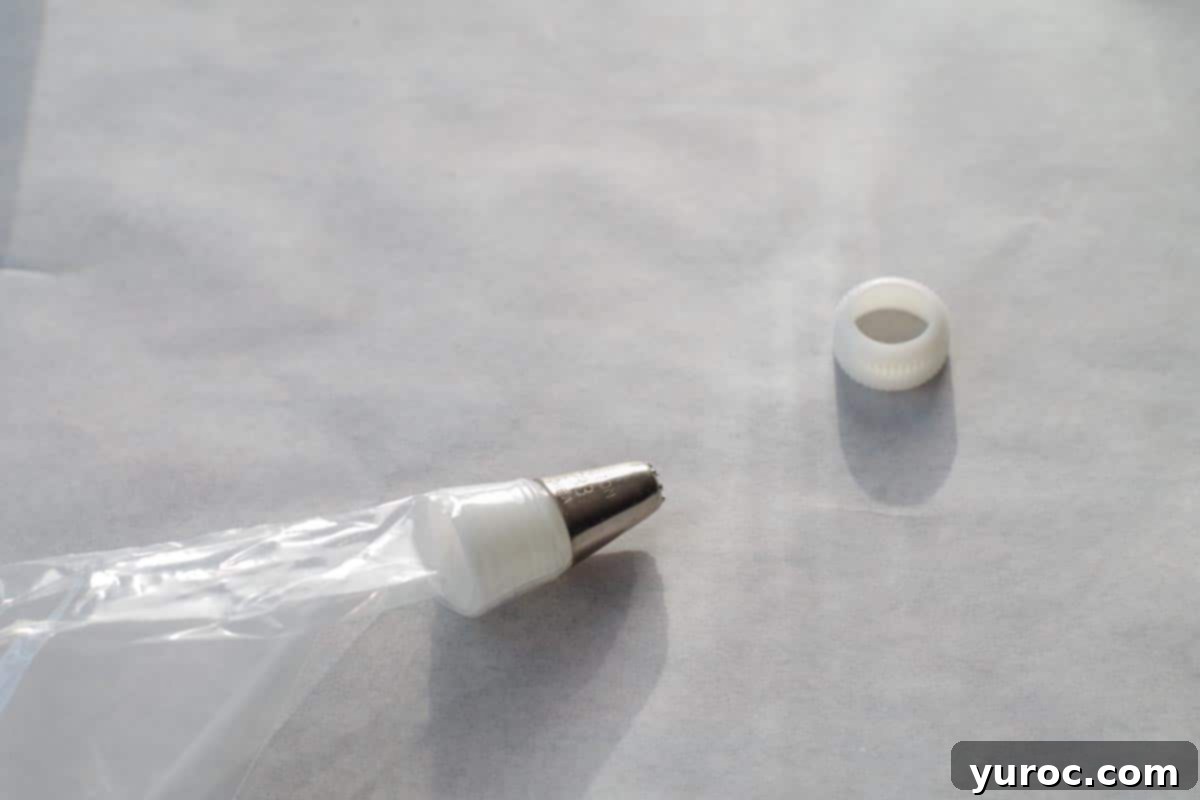
Select your grass piping tip (#233) and place it over the exposed end of the coupler, ensuring it fits snugly. This tip is specifically designed to create the individual strands of “grass” you’re aiming for.
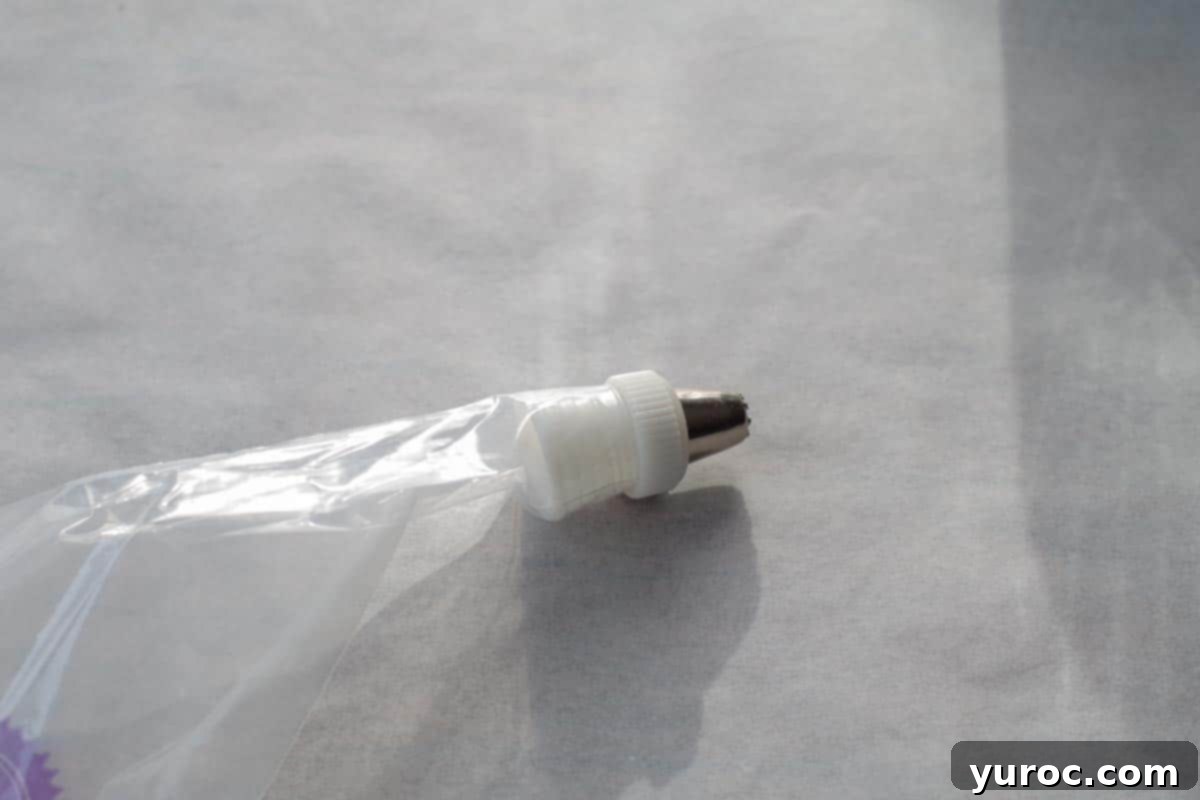
Screw the coupler ring over the piping tip to firmly secure it in place. This prevents the tip from shifting or falling off while you’re piping, ensuring continuous and smooth decoration. As a reminder, if you’re making your own cupcake signs, this is the time to prepare them. For ready-made signs, you can find great options online.
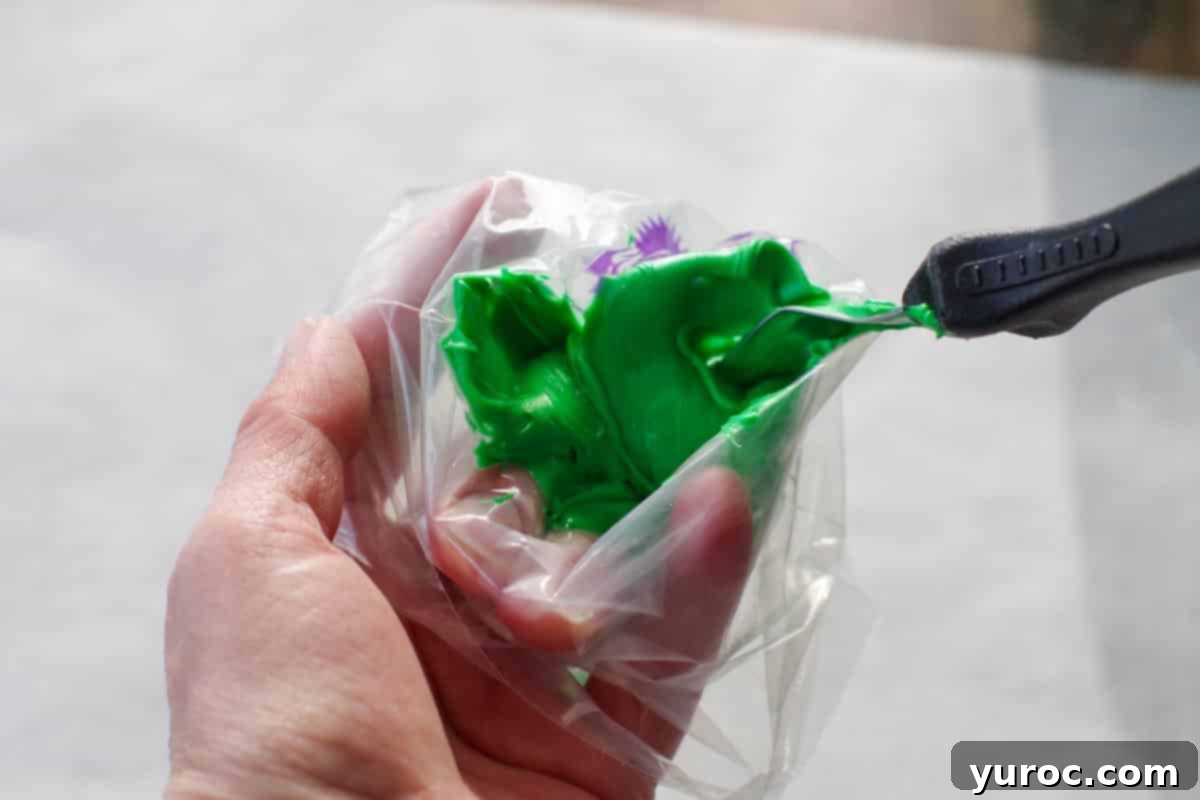
Fold the top edge of the piping bag over your hand (or place it in a tall glass for support) and fill it about two-thirds full with your vibrant green frosting. Avoid overfilling, as this can make it difficult to handle and messy when piping.
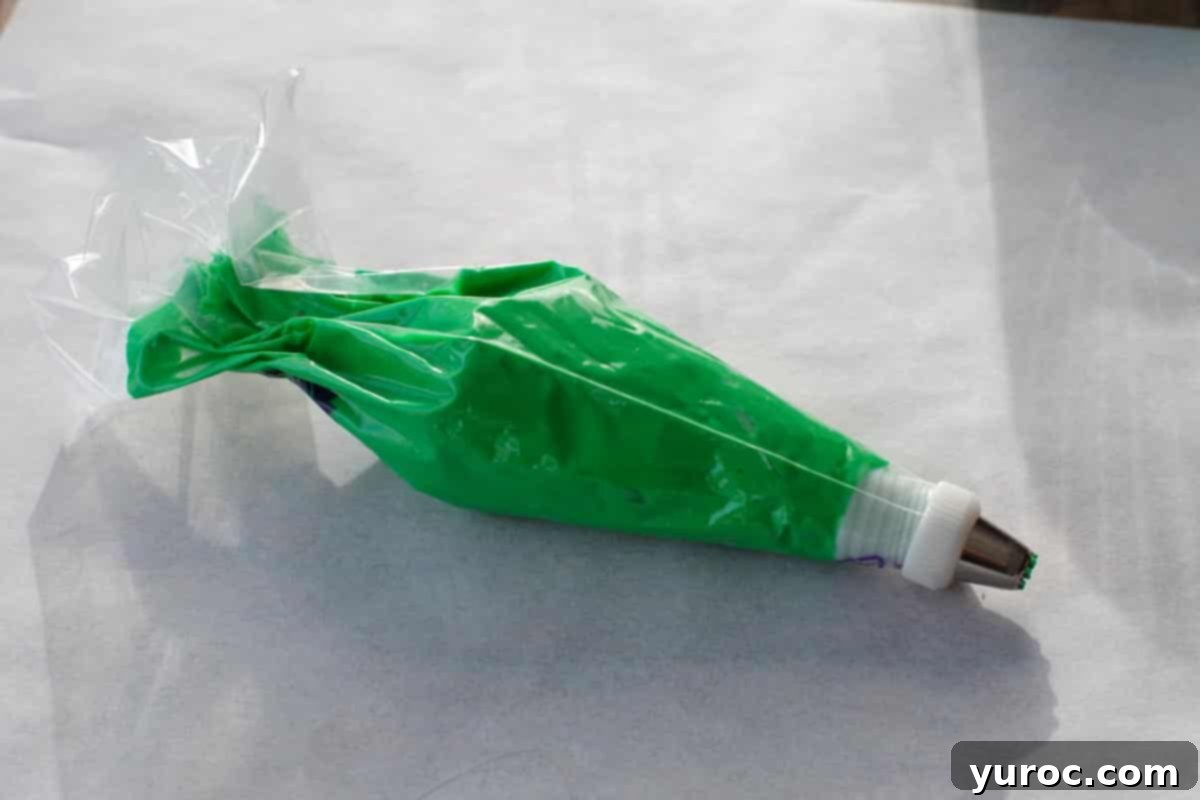
Gather the open end of the piping bag and twist it tightly. This seals the frosting in and helps you maintain pressure while piping, preventing any frosting from squeezing out of the top.
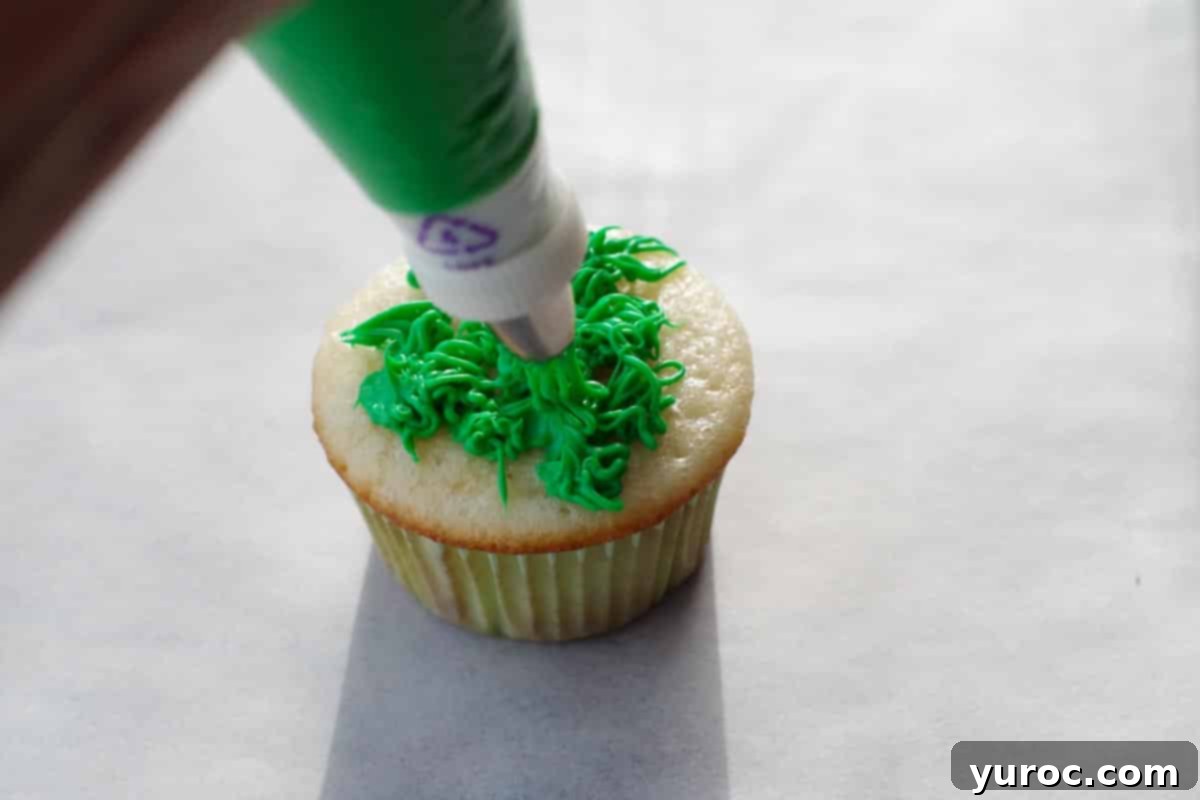
Hold the piping bag vertically, with the grass tip just above the surface of a cooled cupcake. Apply gentle, even pressure to the bag while simultaneously pulling upwards to create short, individual strands of “grass.” For a detailed tutorial, you can refer to Wilton’s guide on how to pipe grass.
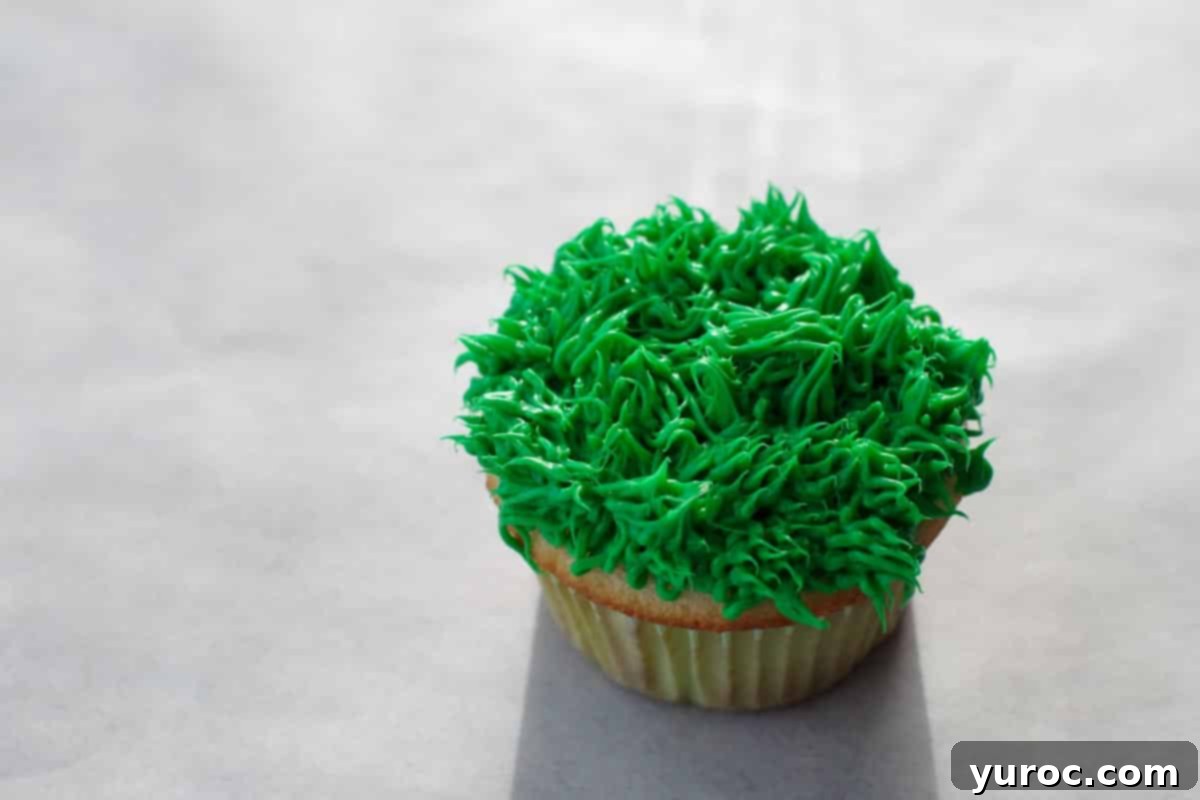
Continue piping these grass strands, working your way around and across the entire top surface of the cupcake until it is completely covered in a lush, green “lawn.” Aim for an even layer of grass that gives a realistic texture.
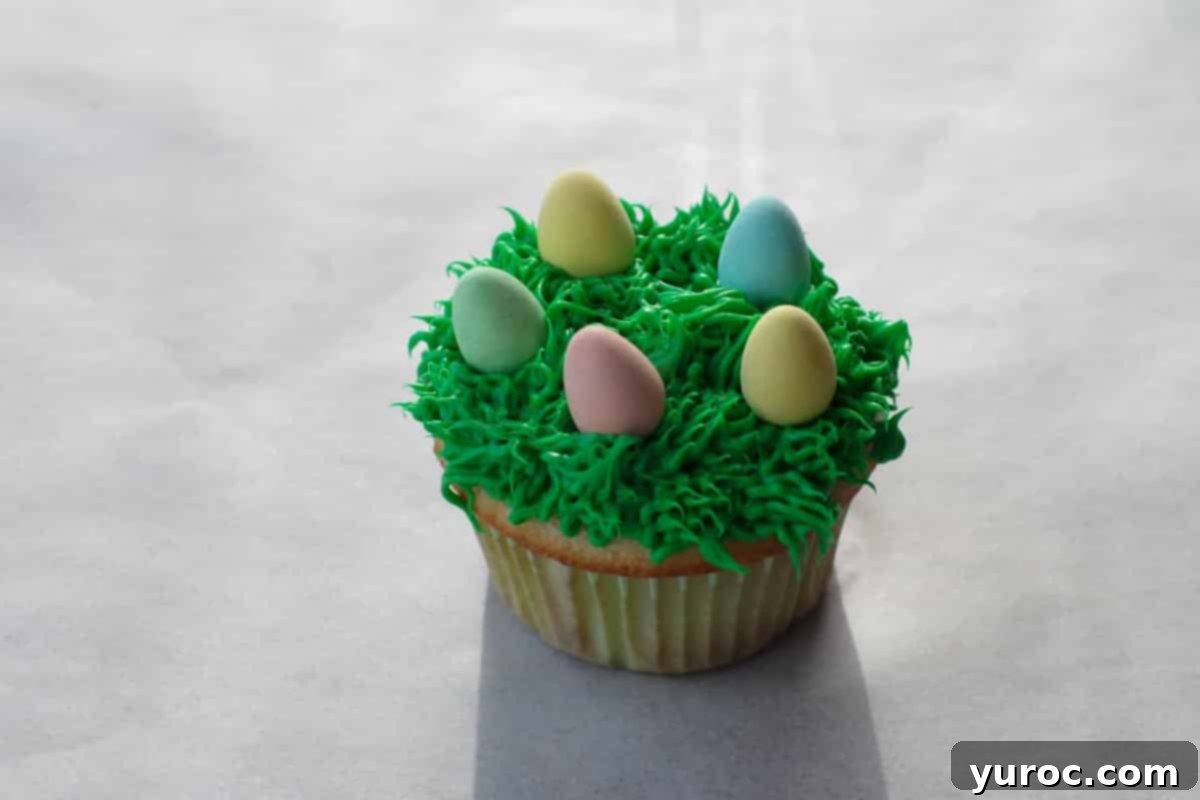
Gently place 4-5 chocolate mini Easter eggs onto the piped grass. Nestle them slightly into the frosting to ensure they stay in place, making them look like hidden treasures waiting to be discovered.
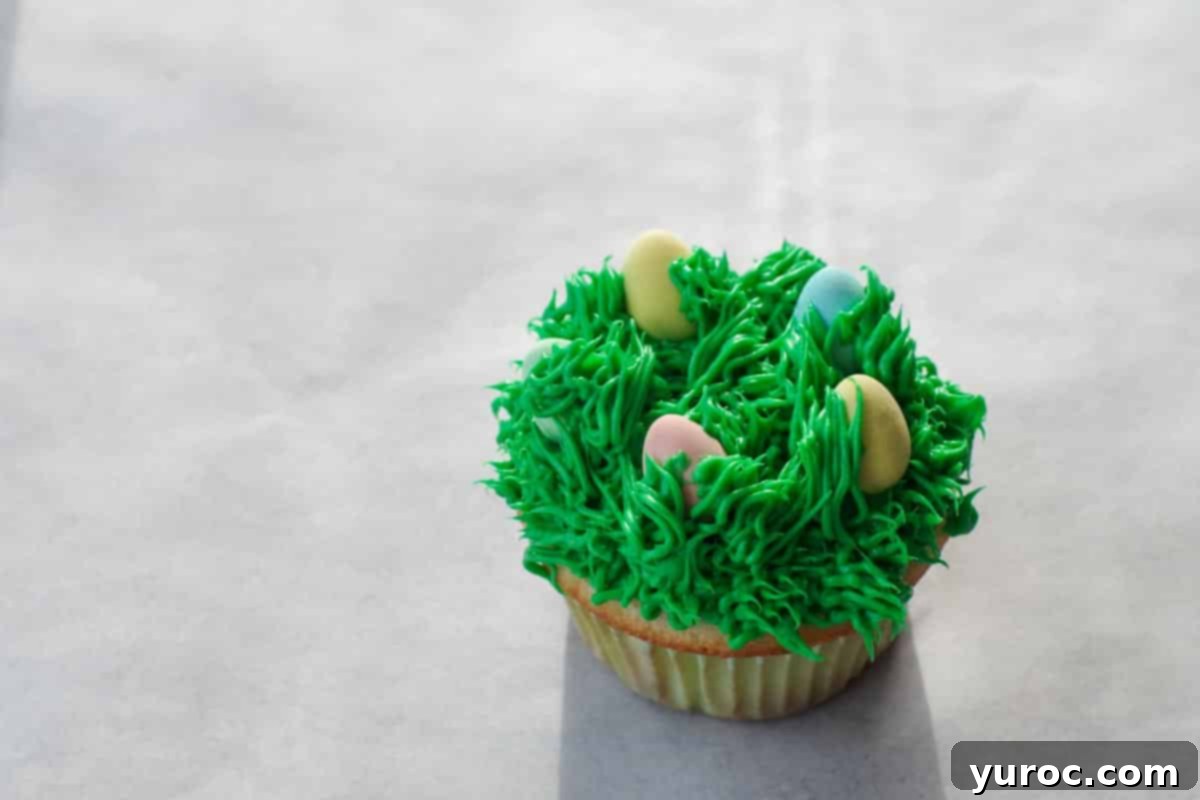
For an even more realistic egg hunt effect, pipe a few more short tufts of grass around the base of some of the candy eggs. This makes them appear partially hidden, as if they’ve just been found in the “lawn.”
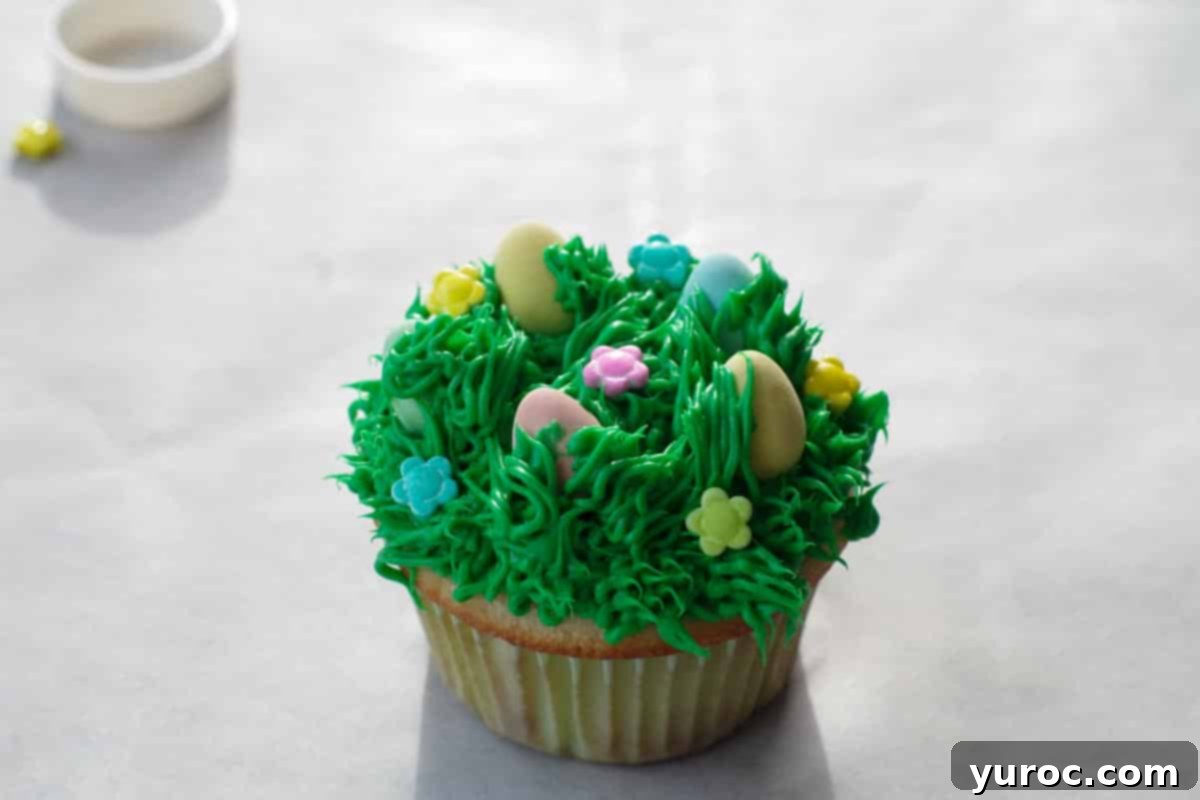
Complete your spring garden scene by adding 4-5 flower-shaped candy sprinkles to each cupcake. Place them strategically among the grass and eggs for a pop of color and extra charm. These tiny details really bring the whole look together.
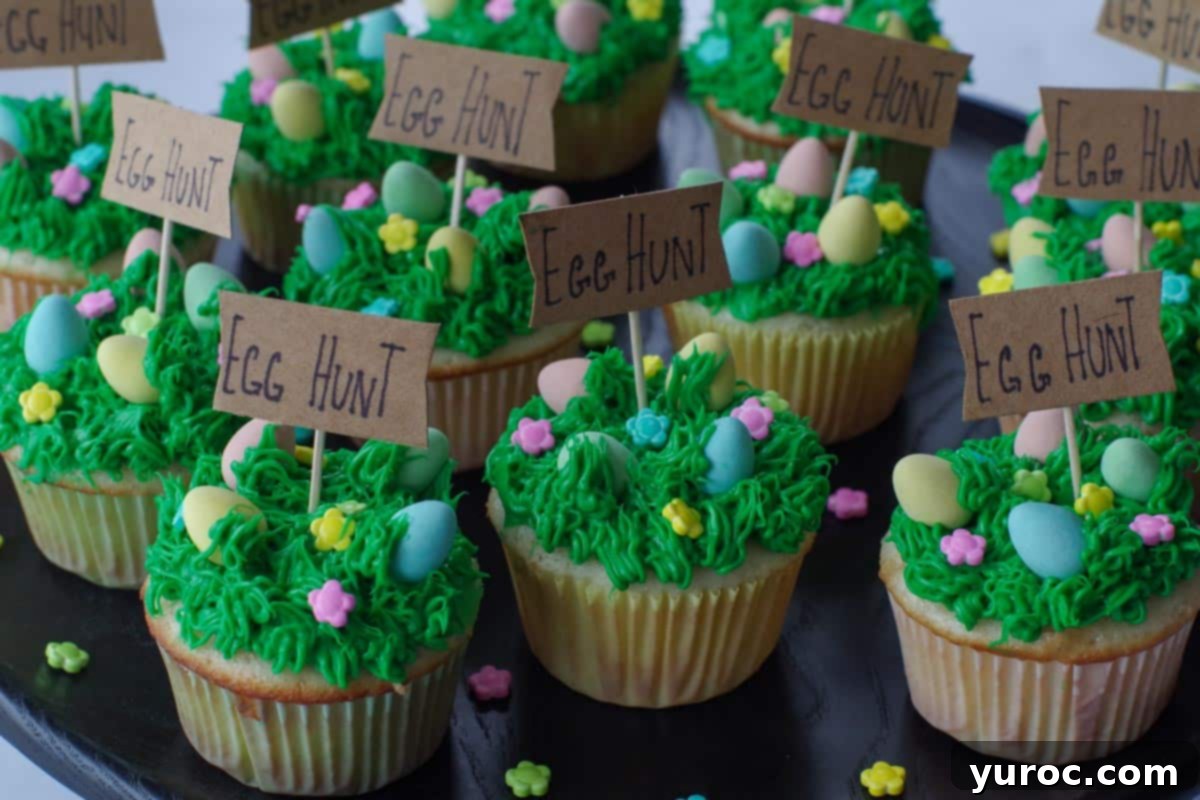
Finally, carefully insert your homemade or purchased “egg hunt” signs into the top of each cupcake. Arrange your finished Mini Egg Cupcakes on a platter and serve immediately, or store them as directed, ready to delight your guests!
✅ Expert Tips for Making the Best Easter Mini Egg Cupcakes
Achieving perfectly festive and delicious Mini Egg Cupcakes is easy with a few insider tricks. These expert tips will help ensure your cupcakes are a resounding success, from baking to the final decorative touches:
- Don’t overfill cupcake liners: Always fill your cupcake liners only about ⅔ full. This crucial step prevents the batter from overflowing during baking, leading to flat-topped cupcakes that are much easier to frost and decorate with an even “grass” surface.
- Use room-temperature ingredients: When making cupcakes from scratch or even with a mix (if adding wet ingredients separately), ensure eggs, butter, and milk are at room temperature. This helps ingredients combine smoothly, resulting in a more uniform batter and ultimately, a more tender and evenly baked cupcake.
- Cool completely before frosting: This tip cannot be stressed enough! Warm cupcakes will cause your carefully prepared frosting to melt, slide off, and completely ruin the intricate grass piping effect. Patience is key – allow cupcakes to cool on a wire rack for at least an hour, or even longer. You can speed this up by placing them in the refrigerator for about 15-20 minutes once they’ve mostly cooled.
- Use gel food coloring: For vibrant, intense colors without altering the frosting’s consistency, always opt for gel-based food coloring. Liquid food coloring can thin out your frosting, making it difficult to pipe firm grass strands. Gel colors are highly concentrated, so start with a tiny amount and add more gradually until you achieve your desired shade of green.
- Chill frosting if needed: If you’re working in a warm kitchen or taking a long time to decorate, your frosting might become too soft and runny. If you notice your piped grass becoming “blobby” (as detailed below), simply place your piping bag (sealed tightly!) in the refrigerator for 10-15 minutes. This will firm it up to a perfect piping consistency.
- Use the right piping tip: The #233 grass tip is specifically designed to create realistic, fine strands of grass. While other tips can create texture, this one provides the most authentic look for your Easter egg hunt. If you don’t have one, a small star tip can create a fluffy, textured surface as an alternative.
- Twist the piping bag end tightly: Before you start piping, make sure the top end of your piping bag is twisted securely. This not only prevents frosting from squeezing out of the top but also helps maintain consistent pressure, giving you better control over your piping.
- Press mini eggs gently into the frosting: When placing your chocolate mini eggs, gently press them into the piped grass. This helps them adhere to the frosting and stay securely in place without sinking or rolling off, creating that perfect “found” look.
- Add extra grass around the eggs: For an even more convincing “egg hunt” appearance, pipe small, short tufts of grass around the base of some of the mini eggs. This makes them look like they are nestled slightly into the ground, enhancing the festive scene.
- Use a toothpick to adjust details: If any frosting strands clump together or you need to make tiny adjustments to your design, a clean toothpick is an invaluable tool. It allows for precise shaping and separation of the “grass.”
- Make decorations ahead: The little “egg hunt” signs can be prepared several days in advance. Store them in an airtight container until you’re ready to assemble. This small step can save valuable time on the day of your Easter celebration.
By incorporating these expert tips, your Mini Egg Cupcakes will not only look stunning but will also be a joy to create and an even bigger delight to eat!
💡 Top Tips for Perfect Grass Frosting
Piping realistic grass is key to the charm of these Mini Egg Cupcakes, and it’s easier than you might think! If you’re new to the technique or want to perfect your skills, Wilton offers excellent instructions on how to pipe grass, complete with visuals and detailed steps.
One common challenge when piping grass is dealing with frosting that’s too warm. If you notice your grass strands are coming out thick and “blobby” rather than distinct and fine (like in the photo below), it’s a clear sign that your frosting is getting too soft. The warmth from your hands or a warm kitchen environment can quickly affect the consistency.
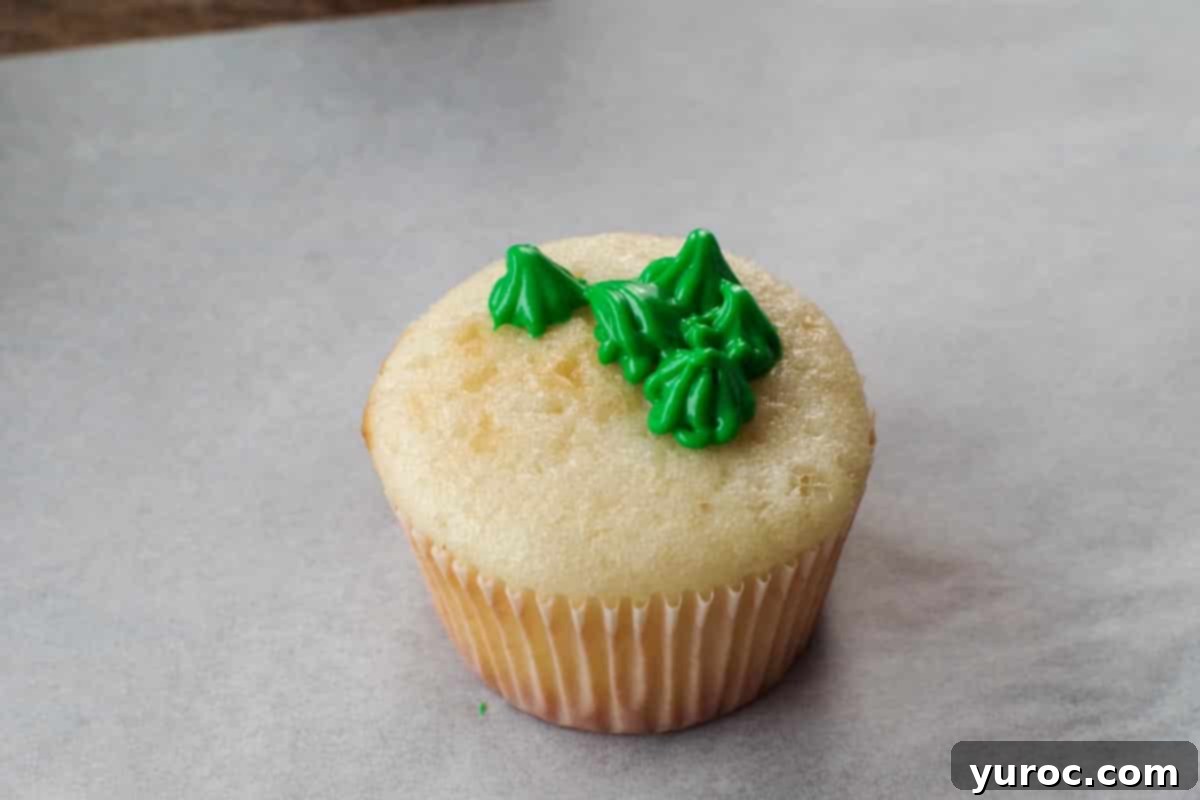
The quick fix? Simply place your piping bag, with the frosting still inside and securely twisted at the top, back into the refrigerator for 10-15 minutes. This chilling period will allow the frosting to firm up to the ideal piping consistency. Once it’s cool, it will work perfectly again, creating those beautiful, defined grass blades that make these cupcakes so special.
🌡️ Storage Tips for Mini Egg Cupcakes
Proper storage ensures your festive Mini Egg Cupcakes stay fresh and delicious for as long as possible. Here’s how to best store them, whether frosted or unfrosted:
- Countertop Storage (Frosted with Non-Perishable Frosting): If you’ve used a shelf-stable frosting (like most store-bought whipped frostings or traditional American buttercream made without cream cheese or fresh cream), these Cadbury mini egg cupcakes can be stored in an airtight container at room temperature for up to 2 days. Keep them away from direct sunlight or heat, which could soften the frosting and melt the mini eggs.
- Refrigerator Storage (Frosted): For optimal freshness, especially if your frosting contains dairy (like cream cheese buttercream) or if you want to extend their shelf life, store the frosted cupcakes in an airtight container in the fridge for up to 5 days. Be aware that refrigeration can sometimes slightly firm up the texture of the cupcake and the candy shells of the mini eggs. Allow them to come closer to room temperature for about 15-30 minutes before serving for the best flavor and texture.
- Freezing (Unfrosted or Frosted):
- Unfrosted Cupcakes: These can be frozen for up to 3 months. Once completely cooled, wrap each unfrosted cupcake individually in plastic wrap, then place them in an airtight freezer-safe bag or container. Thaw at room temperature for a few hours before frosting and decorating.
- Frosted Cupcakes: While possible, freezing frosted cupcakes can sometimes affect the texture of the frosting and the candy. If you do freeze them frosted, place the cupcakes on a baking sheet in the freezer for about 30 minutes until the frosting is firm. Then, wrap each cupcake individually in plastic wrap, followed by a layer of aluminum foil, and store in an airtight container. Thaw overnight in the refrigerator, then let them come to room temperature before serving.
By following these storage guidelines, you can enjoy your beautiful and tasty Mini Egg Cupcakes well beyond your Easter celebration!
👪 Serving Size and Adjustments
This delightful Mini Egg Cupcake recipe is designed to make 12 servings, providing a perfect amount for a small gathering or a family treat. However, we understand that needs vary, especially during holiday entertaining! That’s why the recipe is easily adjustable to suit your specific requirements.
In the recipe card below, you’ll find the option to scale the ingredient quantities. Simply click on the serving number (typically “12 cupcakes”) and select whether you’d like to half, double, or even triple the recipe. The ingredient amounts will automatically adjust, making it incredibly convenient to prepare cupcakes for any size party, from an intimate family dinner to a large Easter brunch. Whether you need a small batch or a grand spread, these cupcakes are ready to be scaled to your heart’s content!
❔ Mini Egg Cupcake Recipe FAQ’s
Absolutely! These cupcakes are excellent for making in advance to ease your holiday preparations. You can bake the unfrosted cupcakes a day or two before you plan to serve them and store them in an airtight container at room temperature. If you decide to frost them ahead, they can be kept in an airtight container in the refrigerator for up to 5 days. For even longer storage, unfrosted cupcakes freeze beautifully for up to 3 months. Just thaw them completely before decorating.
Cadbury Mini Eggs are typically a seasonal item and are widely available at most major grocery stores, supermarkets, and even drugstores in the weeks leading up to Easter. They usually appear shortly after Valentine’s Day. Flower-shaped candy sprinkles can be found in the baking aisle of well-stocked grocery stores, specialty craft stores (like Michaels), or you can easily purchase them online from retailers like Amazon or baking supply websites.
Frosting can soften quickly due to warm hands or a warm kitchen environment, leading to a “blobby” grass effect instead of crisp strands. If you notice your frosting becoming too soft, simply place the entire piping bag (ensuring it’s twisted shut at the top) into the refrigerator for 10-15 minutes. This quick chill will help the frosting firm up to the perfect consistency for piping, allowing you to resume decorating with ease.
No special equipment? No problem! You can still create charming Mini Egg Cupcakes. For the “piping bag,” a large, sturdy resealable plastic bag (like a Ziploc bag) works as a great substitute. Just fill it with frosting, push the frosting into one corner, and snip a tiny bit off the corner with scissors. For the “grass” texture, you can use the tines of a fork to create small peaks and textures on the green frosting, or simply spread a smooth layer of green frosting and place the mini eggs and flowers on top for a delightful garden effect.
While green frosting creates the classic “grass” look for an Easter egg hunt, feel free to get creative! You could use pastel blue for a sky theme, light pink or yellow for a spring garden, or even a mix of pastel colors for a whimsical effect. Just ensure the frosting is white or vanilla-flavored as a base for easy coloring.
I recommend placing 4-5 mini chocolate eggs on each cupcake. This amount creates a plentiful “egg hunt” appearance without overwhelming the cupcake or making it difficult to eat. You can adjust this number based on the size of your cupcakes and your personal preference.
Whether you’re searching for fun and easy Easter cupcakes to bake with the family, or a show-stopping dessert for your Easter dinner, these delicious Mini Egg Cupcakes are an absolute winner!
🐇 More Easter Recipes to Celebrate the Season
If you loved these Mini Egg Cupcakes, you’ll be thrilled to explore more festive recipes perfect for your Easter celebrations. From refreshing drinks to decadent desserts and savory sides, these dishes are sure to complete your holiday menu and impress your guests:
- Easter Egg Punch
- No Bake Easter Creme Egg Icebox Cake – An Easy Easter Dessert
- Steamed Asparagus and Tomato Salad (with Feta)
- Healthy & Light Carrot Cake
Did your family ❤️ this recipe? Did you know that commenting and ⭐ rating recipes is one of the best ways to support your favorite recipe creators? If you LOVED this recipe, please comment and rate it in the recipe card or share photos on social media using the hashtag #foodmeanderings or tagging @foodmeanderings!

📋 Egg Hunt Mini Egg Cupcakes Recipe
Print Recipe
Pin
Save Recipe
Save Recipe
Rate
Dessert, Snack
American, Canadian, North American
Vegetarian
12
cupcakes
361
kcal
Terri Gilson
30
minutes
30
minutes
Prevent your screen from going dark
Add to Shopping List
Go to Shopping List
Equipment
-
muffin tin -
piping bag -
coupler -
tip #233 (grass tip) -
electric mixer -
large mixing bowl
Ingredients
-
12
cupcakes (homemade, mix, or store-bought) -
¼
cup
flower shaped candy cupcake sprinkles
-
2
cups
vanilla or white frosting (store-bought or homemade) -
½
teaspoon
green gel food coloring (adjust to desired shade) -
1
cup
chocolate mini eggs (Cadbury recommended)
Metric
Instructions
-
Bake your cupcakes according to the recipe or package directions you are using. Remember to only fill the cupcake liners to ⅔ full to prevent overflowing.
Once baked, transfer the cupcakes to a wire rack and allow them to cool completely. This is very important before frosting!
-
In a medium bowl, combine the vanilla or white frosting with the green gel food coloring. Mix thoroughly with an electric mixer until the color is vibrant and uniform. Add more green food coloring gradually, if needed, until you reach your desired “grass” shade.
-
Prepare your “egg hunt” signs (if using). You can easily create these in advance using cardstock and toothpicks, or purchase them online.
-
Insert the coupler into a piping bag and trim off the end of the bag, ensuring the coupler tip extends slightly.
-
Place the grass piping tip (#233) onto the coupler at the end of the piping bag.
-
Secure the tip by screwing the coupler ring over it, making sure it’s tight.
-
Fold the top of the piping bag over and fill it approximately ⅔ full with your green frosting.
-
Twist the open top of the piping bag tightly to prevent frosting from spilling out while you pipe.
-
Hold the piping bag vertically with the grass tip just above the cupcake surface. Apply gentle, consistent pressure and pull straight up to create strands of “grass.” For a visual guide, see Wilton’s tutorial on piping grass.
-
Continue piping over the entire top of the cupcake until it is completely covered with lush green grass frosting.
-
Gently place 4-5 chocolate mini Cadbury eggs onto the piped grass, nestling them slightly to secure them.
-
For an authentic “egg hunt” look, pipe a little more grass around the base of some of the eggs, making them appear partially hidden.
-
Scatter about 4-6 flower-shaped candy sprinkles onto each cupcake, completing your vibrant spring scene.
-
Carefully add your prepared “egg hunt” signs to the top of each cupcake and serve these delightful treats to your family and friends!
Notes
Expert Tips for Perfect Mini Egg Cupcakes:
-
- Don’t overfill cupcake liners – Fill cupcake liners only ⅔ full to prevent overflowing and create an even surface for decorating.
-
- Use room-temperature ingredients – This ensures a smooth batter and even baking.
-
- Cool completely before frosting – Warm cupcakes will melt the frosting and ruin the grass piping effect.
-
- Use gel food coloring – Gel-based food coloring gives a vibrant green without making the frosting runny.
-
- Chill frosting if needed – If your frosting gets too soft, refrigerate the piping bag for 10-15 minutes to firm it up.
-
- Use the right piping tip – A #233 grass tip creates the best grass effect. If you don’t have one, a small star tip can work as an alternative.
-
- Twist the piping bag end tightly – This prevents frosting from spilling out while piping.
-
- Press mini eggs gently into the frosting – This helps them stay in place without sinking.
-
- Add extra grass around the eggs – Piping small tufts of grass around the eggs enhances the “Easter egg hunt” look.
-
- Use a toothpick to adjust details – If needed, use a toothpick to separate any frosting strands that clump together.
-
- Make decorations ahead – You can create the little egg hunt signs a few days in advance for easy assembly.
Storage:
These Cadbury mini egg cupcakes can be stored for up to 2 days in an airtight container on the counter (if you are using a nonperishable frosting) and in the fridge for 5 days. They can be frozen for up to 3 months.
Nutrition
Serving:
1
cupcake
|
Calories:
361
kcal
(18%)
|
Carbohydrates:
57
g
(19%)
|
Protein:
3
g
(6%)
|
Fat:
14
g
(22%)
|
Saturated Fat:
3
g
(19%)
|
Polyunsaturated Fat:
4
g
|
Monounsaturated Fat:
4
g
|
Cholesterol:
3
mg
(1%)
|
Sodium:
217
mg
(9%)
|
Potassium:
83
mg
(2%)
|
Fiber:
1
g
(4%)
|
Sugar:
46
g
(51%)
|
Vitamin A:
22
IU
|
Vitamin C:
0.1
mg
|
Calcium:
75
mg
(8%)
|
Iron:
1
mg
(6%)
Did you make this recipe?
Please leave a star rating and review below!