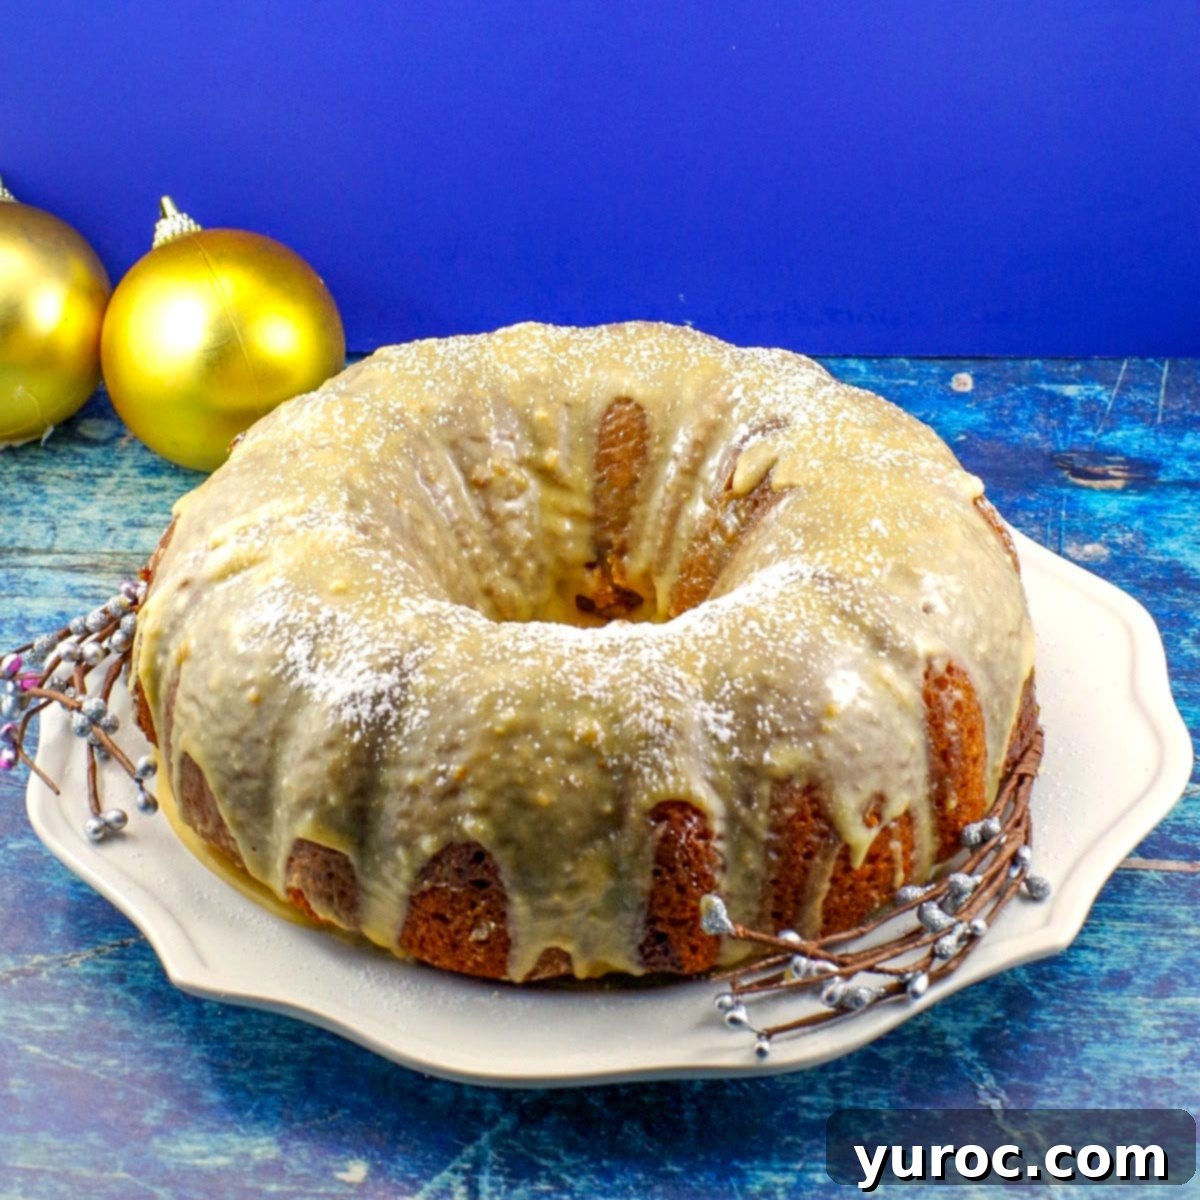
Decadent Butter Tart Bundt Cake: A Swirled Canadian Christmas Delight with Brown Butter Maple Glaze
As a child, the festive season was magical for me – the sparkling decorations, the excitement of gifts, the anticipation of snow, heartwarming family gatherings, and above all, the incredible food! Christmas was synonymous with indulging in cherished, special treats that graced our table only once a year. Among these, my Grandma’s homemade butter tarts held a particularly special place. Their sweet, gooey filling encased in a flaky pastry inspired me to create a dessert that captures that same nostalgic essence: this exquisite Butter Tart Bundt Cake. It’s a wonderfully moist bundt cake, intricately swirled with that signature sticky, sweet butter tart filling, all crowned with a rich, aromatic brown butter maple glaze. This recipe truly transforms a beloved Canadian classic into an elegant and utterly decadent dessert, perfect for any holiday celebration.
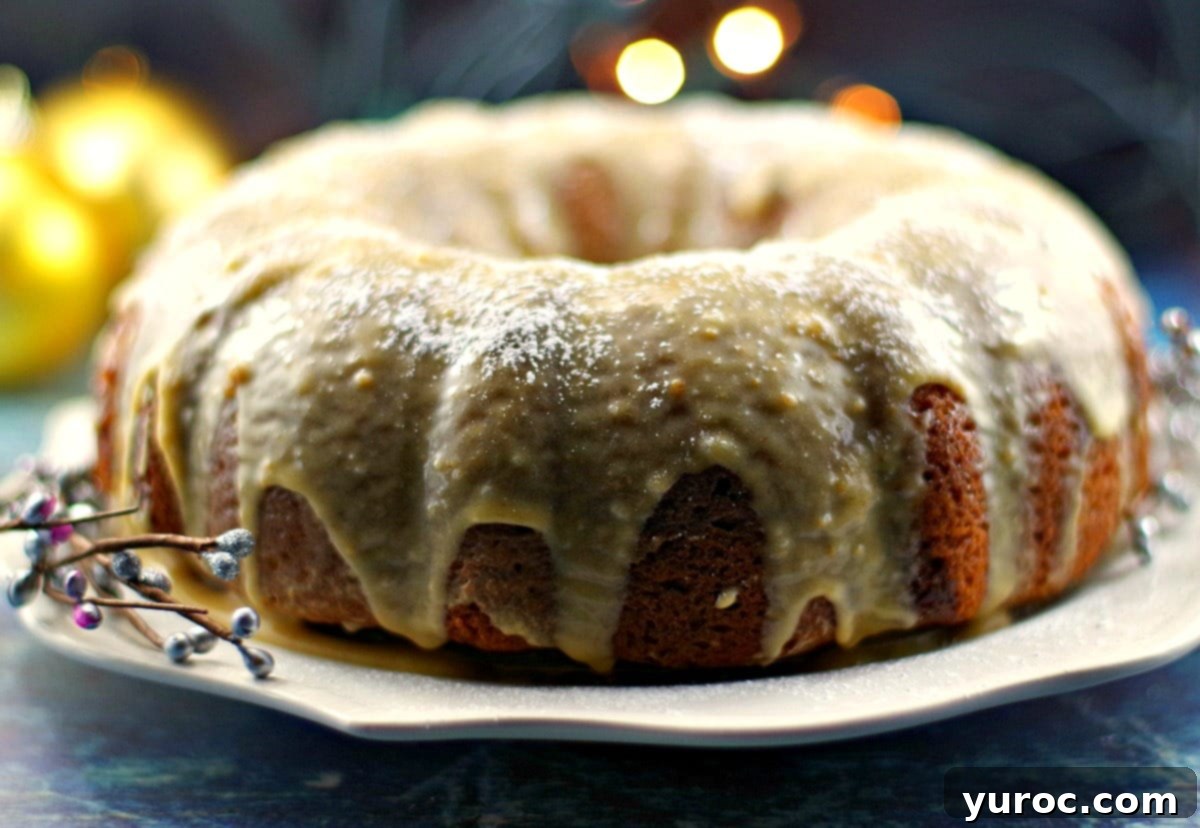
For countless Canadians, myself included, Butter Tarts are more than just a pastry; they are a symbol of Christmas, embodying warmth, comfort, and tradition. They are the quintessential Canadian comfort food, deeply woven into our culinary heritage. My adoration for butter tarts runs so deep that I found myself craving their unique flavor in more forms than just the traditional tart. This passion led me on a creative journey, resulting in this spectacular Butter Tart Bundt Cake with Brown Butter Maple Glaze. But my butter tart obsession didn’t stop there! I also developed these delightful Butter Tart Cookies, indulgent Butter Tart Waffles, charming Butter Tart Cupcakes, creamy No-Churn Butter Tart Ice Cream, and a versatile Butter Tart Slice.
This Butter Tart Cake is not only surprisingly simple to prepare, making it accessible for home bakers of all skill levels, but it also serves as the ideal show-stopping dessert for your Christmas dinner or any festive gathering. Its rich flavors and beautiful presentation elevate it beyond a simple cake, truly making it the ultimate Canadian Christmas food experience. The luscious butter tart filling is expertly swirled into a tender, buttery bundt cake batter, creating pockets of sweet, gooey bliss throughout each slice. This is then lavishly coated with a smooth, aromatic brown butter maple glaze that adds another layer of irresistible flavor and a stunning finish. It’s a delicious butter tart in the convenient and celebratory form of a cake!
[feast_advanced_jump_to]
🥘 Essential Ingredients for Your Butter Tart Bundt Cake
To create this irresistible butter tart cake, you’ll need a selection of high-quality ingredients, carefully chosen to deliver optimal flavor and texture:
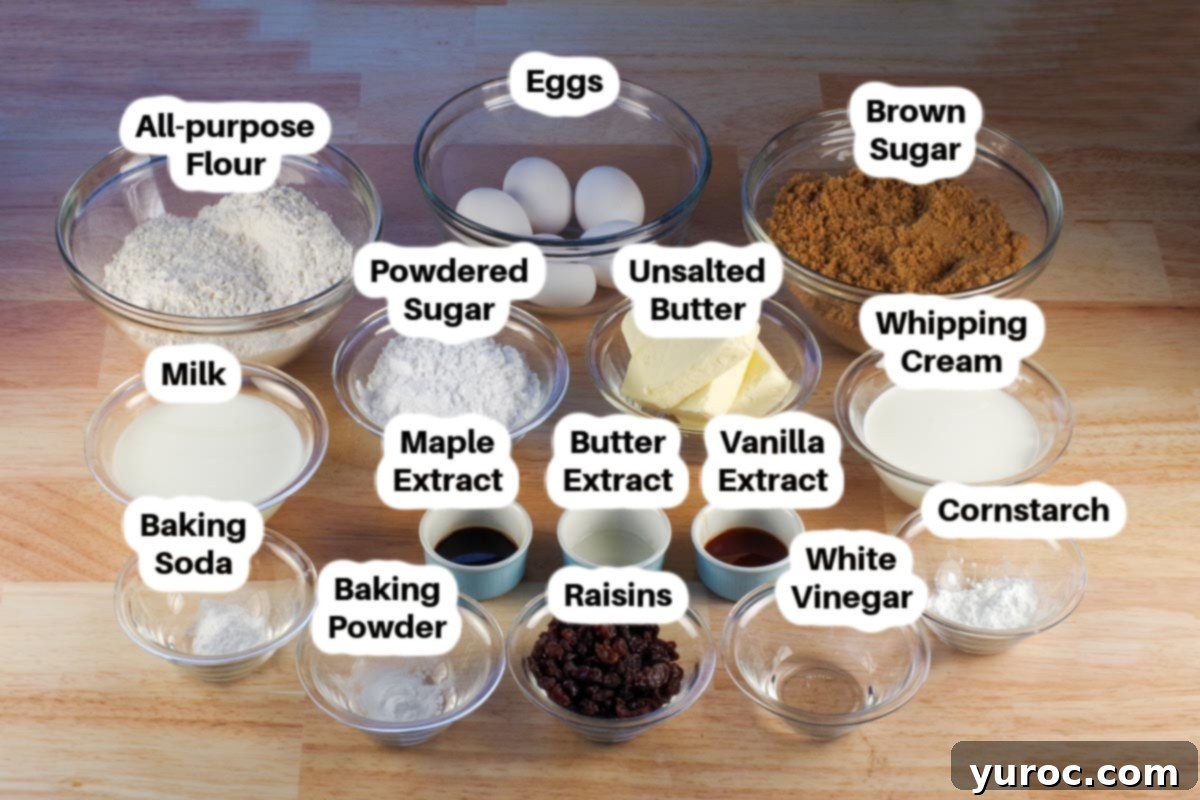
- Flavorful Extracts: The extracts are crucial for imparting a deep, complex flavor profile to this cake. While vanilla is a baking staple, don’t be tempted to substitute it for the other specified extracts. Maple and butter extracts are key to achieving that authentic butter tart taste. If you can’t find them at your local grocery store, they are readily available online (such as through Amazon) or at specialty craft and cake decorating shops. These extracts work synergistically to enhance the overall aroma and taste of the cake and its filling.
- Brown Sugar – Your Choice Matters: The type of brown sugar you choose will significantly impact the color of both the cake and its delectable swirl filling. Using light brown sugar will result in a golden yellow hue, as seen in the main photos. Dark brown sugar, on the other hand, will yield a richer, deeper brown color. While the color difference is noticeable, the impact on taste is subtle; dark brown sugar offers a slightly more pronounced molasses flavor. Both work beautifully, so choose based on your desired aesthetic and a slight preference for molasses notes.
- Heavy Whipping Cream (33-36% Fat): This ingredient is essential for achieving the luxurious, creamy texture found in both the swirled filling and the cake batter itself. It’s important to use liquid whipping cream, not pre-whipped cream. For best results, ensure your cream has a fat content between 33% and 36%. This higher fat content provides richness and contributes to the moist crumb of the cake.
- Unsalted Butter (High Quality Recommended): I always opt for unsalted butter in baking recipes. This allows me complete control over the salt content, ensuring the perfect balance of flavors. It’s also important to use a good quality butter. Lower-quality, “no-name” brands often have a higher water content, which can negatively affect the texture of your baked goods. Based on extensive research and personal experience, brands like Lactantia are recommended due to their consistently low water content, leading to superior baking results. Room temperature butter is critical for a smooth batter, so plan ahead!
- White Vinegar: A small amount of vinegar plays a vital role in this recipe. It beautifully balances the intense sweetness and rich, buttery flavors, adding a subtle tang that prevents the cake from being overly cloying. It also reacts with the baking soda to create a light and tender crumb.
*A comprehensive list of all ingredients and their exact quantities can be found in the detailed recipe card below.
Expert Tips for a Perfect Butter Tart Cake
Achieving a truly spectacular Butter Tart Bundt Cake requires attention to detail. Here are some invaluable tips to ensure your baking success:
- Ensure Room Temperature Butter and Eggs: This seemingly small detail makes a significant difference. Room temperature butter creams together with sugar much more effectively, incorporating air for a lighter texture. Similarly, room temperature eggs emulsify better into the batter, preventing curdling and ensuring a smooth, uniform, and lump-free consistency. Plan ahead by taking these ingredients out of the fridge at least 30-60 minutes before you begin baking.
- Invest in Quality Ingredients, Especially Butter: The quality of your ingredients directly impacts the final taste and texture of your cake. This is particularly true for butter, which forms the backbone of both the cake and the filling. In recent years, many bakers, especially in Canada, have noted a change in butter quality, with some brands having higher water content. “No-name” or budget butter brands often fall into this category and should be avoided for best results. Brands known for lower water content, such as Lactantia, are highly recommended. Better butter leads to a richer flavor and a more desirable crumb.
- Utilize a Bundt Pan for Even Baking: A bundt pan isn’t just for aesthetics; its fluted design allows more of the cake surface to come into contact with the heated pan, facilitating more even heat distribution. This promotes consistent baking and a beautifully golden crust all around. While an angel food cake pan can be used as an emergency substitute, the bundt pan truly yields the best results.
- Master the Swirl Technique: The butter tart filling swirl is key to this cake’s charm. You want distinct ribbons of gooey filling, not a muddled mess. Swirl enough to integrate the filling throughout the batter, preventing large clumps. However, avoid over-swirling, which can lead to the filling completely blending in and disappearing. The trick is to cut deep into the batter with a knife and gently lift while twirling, creating those beautiful, defined streaks.
- Thoroughly Grease Your Pan (and Consider Cake Release): A well-greased pan is your best friend when baking a bundt cake. Nothing is more disheartening than a cake sticking to the pan. I highly recommend a product like “Wilton Cake Release” – it’s incredibly effective at ensuring a clean release every time. Apply it generously to all the nooks and crannies of your bundt pan. If, despite your best efforts, small bits of cake do stick, don’t despair! The generous glaze will beautifully mask any minor imperfections.
- Achieve the Right Filling Consistency: The butter tart swirl filling must be thick, resembling a rich pudding, before you incorporate it into the cake batter. If the filling is too thin, it won’t hold its shape within the cake, leading to an improperly cooked, wet, and potentially collapsed cake. Be patient during the simmering and whisking process, as it often thickens significantly in the last few minutes. If you’re unsure, it’s safer to slightly over-thicken than under-thicken.
- Don’t Skimp on Chilling Time: While it’s tempting to dive into a warm cake, this Butter Tart Bundt Cake truly shines when served cold. Proper cooling in the pan, followed by additional cooling on a wire rack, and then thorough chilling in the refrigerator, allows the flavors to meld, the cake to firm up, and the glaze to set perfectly. This also enhances the texture of the gooey filling.
📖 Creative Variations for Your Butter Tart Cake
This Butter Tart Bundt Cake recipe is wonderfully adaptable, allowing for delightful variations to suit different occasions and preferences:
- Mini Butter Tart Bundt Cakes: For charming individual servings or bake sales, transform this recipe into mini bundt cakes. Simply divide the batter and filling among mini bundt molds. Reduce the baking time to approximately 30 minutes, or until a cake tester inserted into the center comes out clean. These miniature versions are perfect for portion control, easy to serve, and always a hit at gatherings or fundraising events.
- Raisins or Pecans – Your Preference: While raisins are a traditional component of classic butter tarts, many prefer the nutty crunch of pecans. Feel free to substitute the ½ cup of raisins with ½ cup of finely chopped pecans in the butter tart filling for a different texture and flavor profile. You could also try a mix of both, or even add other dried fruits like currants or chopped dried cranberries for a festive twist.
- Cornstarch Alternatives for Thickening: If cornstarch isn’t available, or you prefer an alternative, there are a few options to thicken the butter tart filling. You can create a simple roux by whisking a small amount of all-purpose flour with a neutral oil or melted butter over low heat until a paste forms, then gradually whisk it into your simmering filling until thickened. Alternatively, arrowroot powder can be used as a direct substitute for cornstarch, typically at a 1:1 ratio, though it’s best to mix it with a cold liquid first to prevent clumping.
- Spice it Up: Add a pinch of cinnamon or nutmeg to the cake batter or the butter tart filling for an extra layer of warmth and holiday spice.
- Zesty Twist: A little lemon or orange zest in the cake batter can brighten the flavors and add a refreshing counterpoint to the sweetness.
- Boozy Glaze: For an adult-friendly version, consider adding a tiny splash of rum or bourbon to the brown butter maple glaze after it has cooled slightly.
🔪 How to Make Butter Tart Cake: A Detailed Guide
Creating this spectacular Butter Tart Bundt Cake is a rewarding process. Follow these detailed steps to ensure a flawless and delicious result:
PREP WORK: Begin by thoroughly greasing your bundt cake pan with a non-stick cooking spray or, even better, a specialized cake release product like Wilton Cake Release, ensuring all intricate crevices are coated. Preheat your oven to 325 degrees F (162 degrees C).
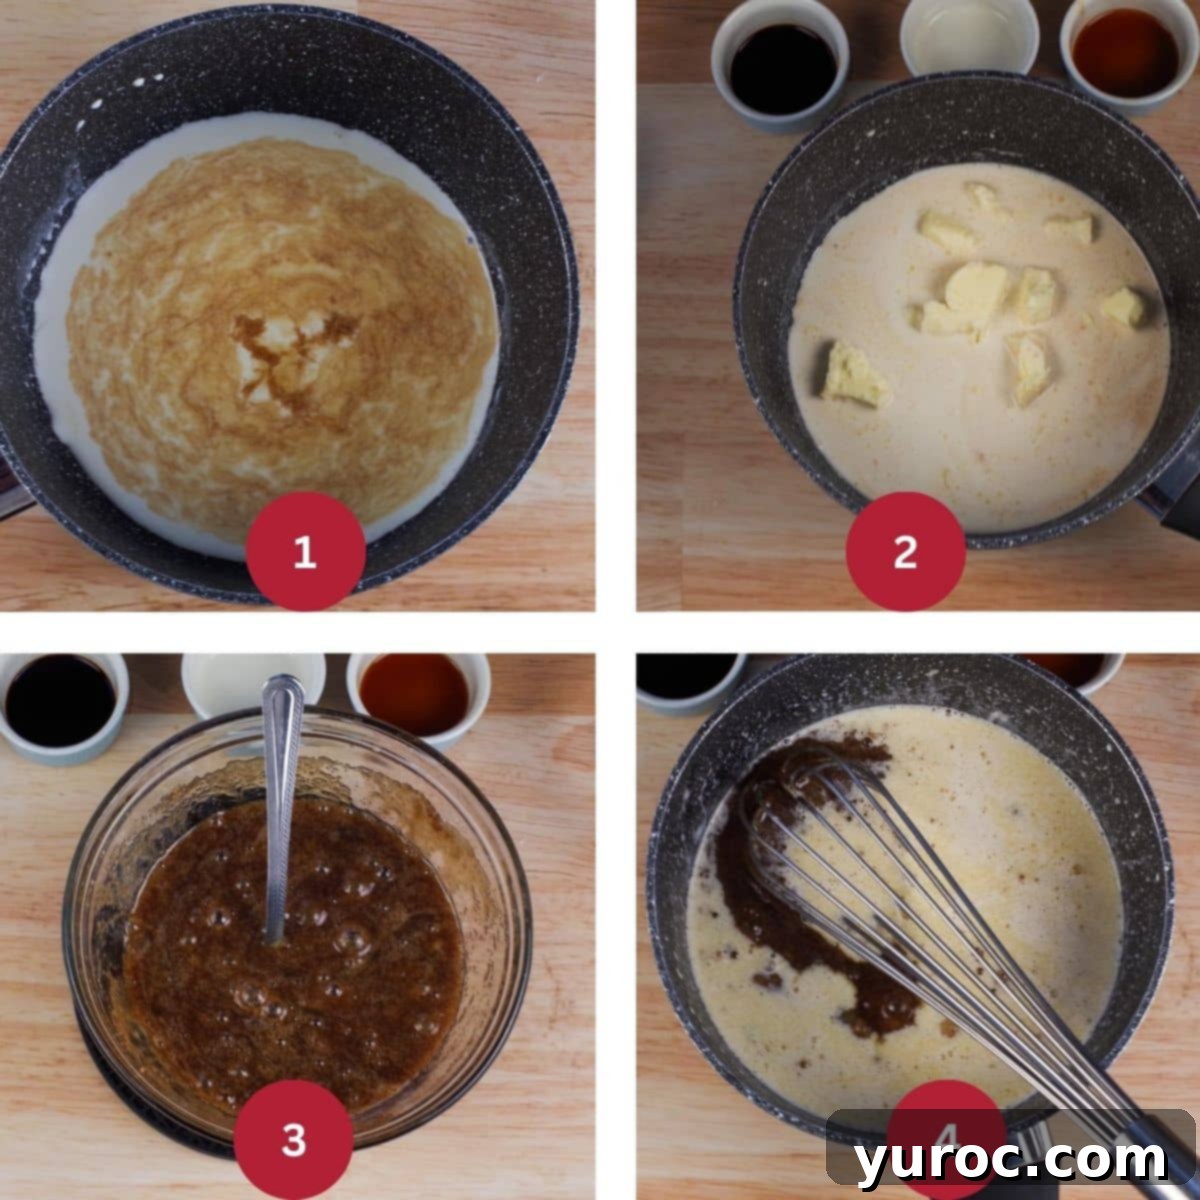
MAKE THE BUTTER TART SWIRL FILLING (STEP 1):
- In a medium-sized pot set over medium-low heat on your stovetop, combine 1 teaspoon of vanilla extract with ¼ cup plus 2 tablespoons of whipping cream. Gently heat the mixture until it is warm to the touch (Image 1).
- Once warm, add 2 tablespoons plus 2 teaspoons of unsalted butter to the cream mixture, stirring until the butter is fully melted and incorporated (Image 2).
- In a separate large mixing bowl, crack 3 eggs and combine them with 1 ½ cups of brown sugar. Whisk these ingredients vigorously until the mixture is smooth, pale, and well combined (Image 3).
- Carefully pour the egg and brown sugar mixture into the warm cream and butter mixture in the pot. Reduce the heat to low and allow it to simmer gently (Image 4).
THICKEN THE FILLING (STEP 2):
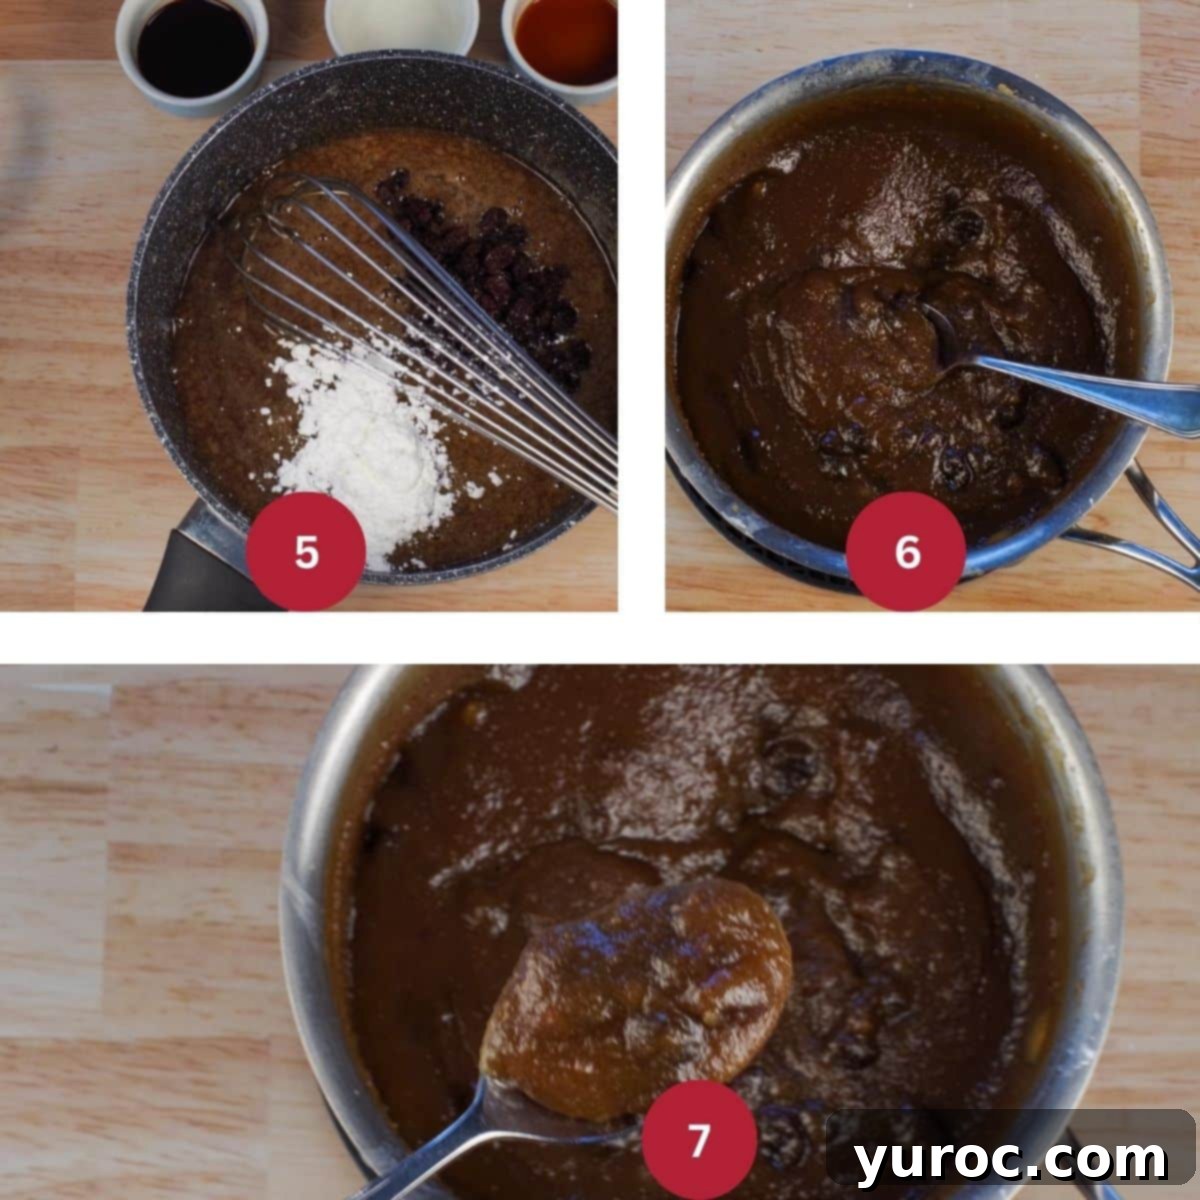
- Into the simmering filling, whisk in 1 ½ teaspoons of vinegar and 2 teaspoons of cornstarch until no lumps remain. Now, add ½ cup of either raisins or chopped pecans, depending on your preference (Image 5).
- Continue whisking constantly over medium-low heat for approximately 12-15 minutes. This step requires patience; the mixture won’t appear to thicken much until the final 5-7 minutes. Keep whisking diligently. The desired consistency is that of a thick gravy or a pourable pudding (Image 6). If, after 15 minutes, it’s not adequately thick, whisk in an additional ½ to 1 teaspoon of cornstarch and continue cooking until it reaches the correct consistency. This thickness is absolutely crucial; if the filling is too thin, the cake will not bake properly and will result in a wet, unset center.
- Once thickened, remove the pot from the heat and allow the filling to cool completely. As it cools, it will continue to thicken to a luscious, pudding-like texture. For best results, I often prepare the filling the night before and let it chill in the refrigerator overnight, ensuring maximum thickness. If you’re short on time, you can rapidly thicken it by placing it in the freezer for about 30 minutes (Image 7).
MAKE THE CAKE BATTER (STEP 2, continued):
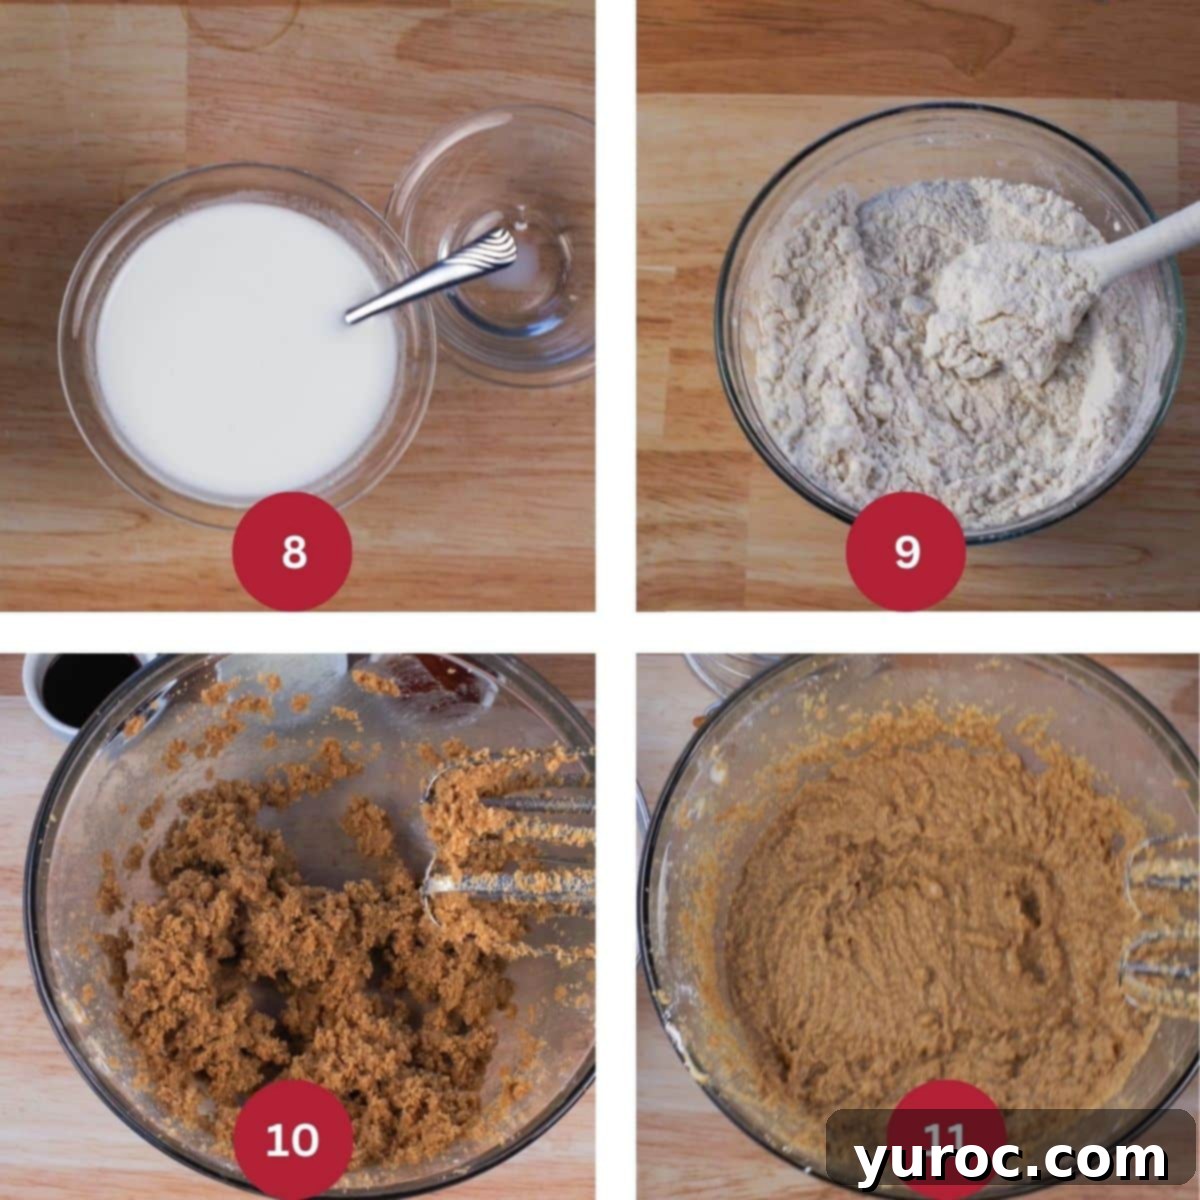
- In a measuring cup, pour 1 teaspoon of white vinegar into 1 cup of milk. Give it a gentle stir and let it stand for about 5 minutes; this will create a buttermilk substitute that adds tenderness to the cake (Image 8).
- In a separate medium bowl, sift together 2 ½ cups of all-purpose flour and ½ teaspoon of baking powder. Set this dry mixture aside (Image 9).
- In a large mixing bowl, using an electric hand mixer (or the paddle attachment of a stand mixer), cream together 1 cup of softened unsalted butter and 2 cups of brown sugar until the mixture is light, fluffy, and pale (Image 10).
- To the creamed butter and sugar, beat in 1 teaspoon of vanilla extract and 1 teaspoon of butter extract, followed by 2 large eggs, one at a time, ensuring each is fully incorporated before adding the next. Finally, beat in ¼ cup of whipping cream until just combined (Image 11).
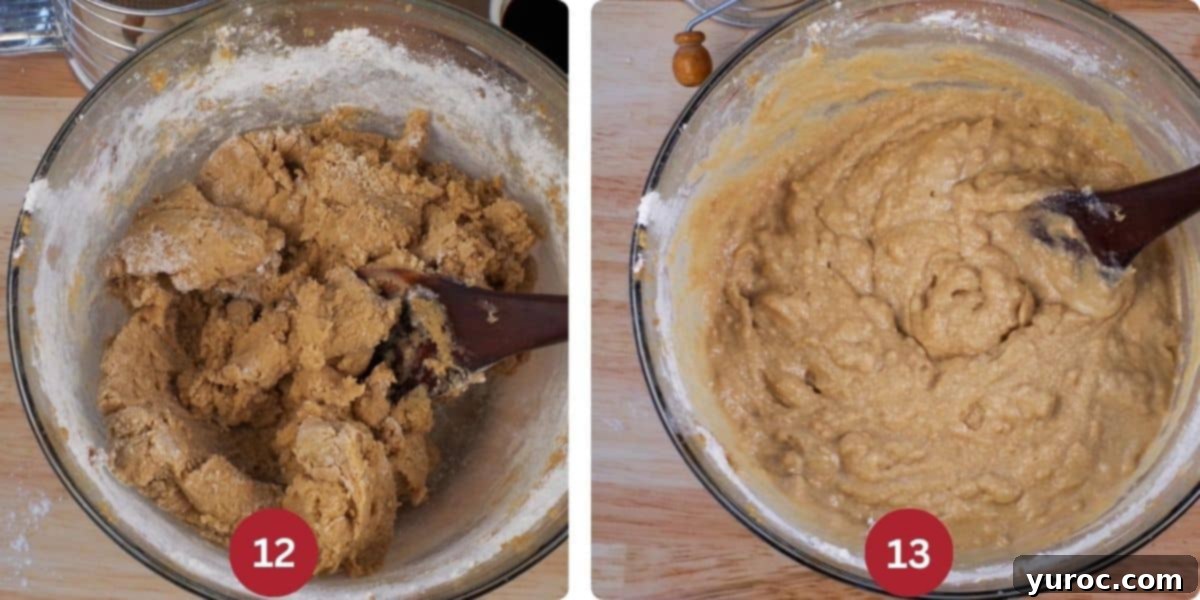
- Gradually add the sifted dry ingredients into the wet mixture, mixing on low speed until they are just combined. Be careful not to overmix (Image 12).
- Now, add 1 teaspoon of baking soda to the milk and vinegar mixture (the “buttermilk”). Stir gently and watch it bubble up. Immediately fold this activated milk mixture into the cake batter, stirring only until just combined. The batter should be smooth but avoid overworking it (Image 13).
ASSEMBLE THE CAKE (STEP 3):
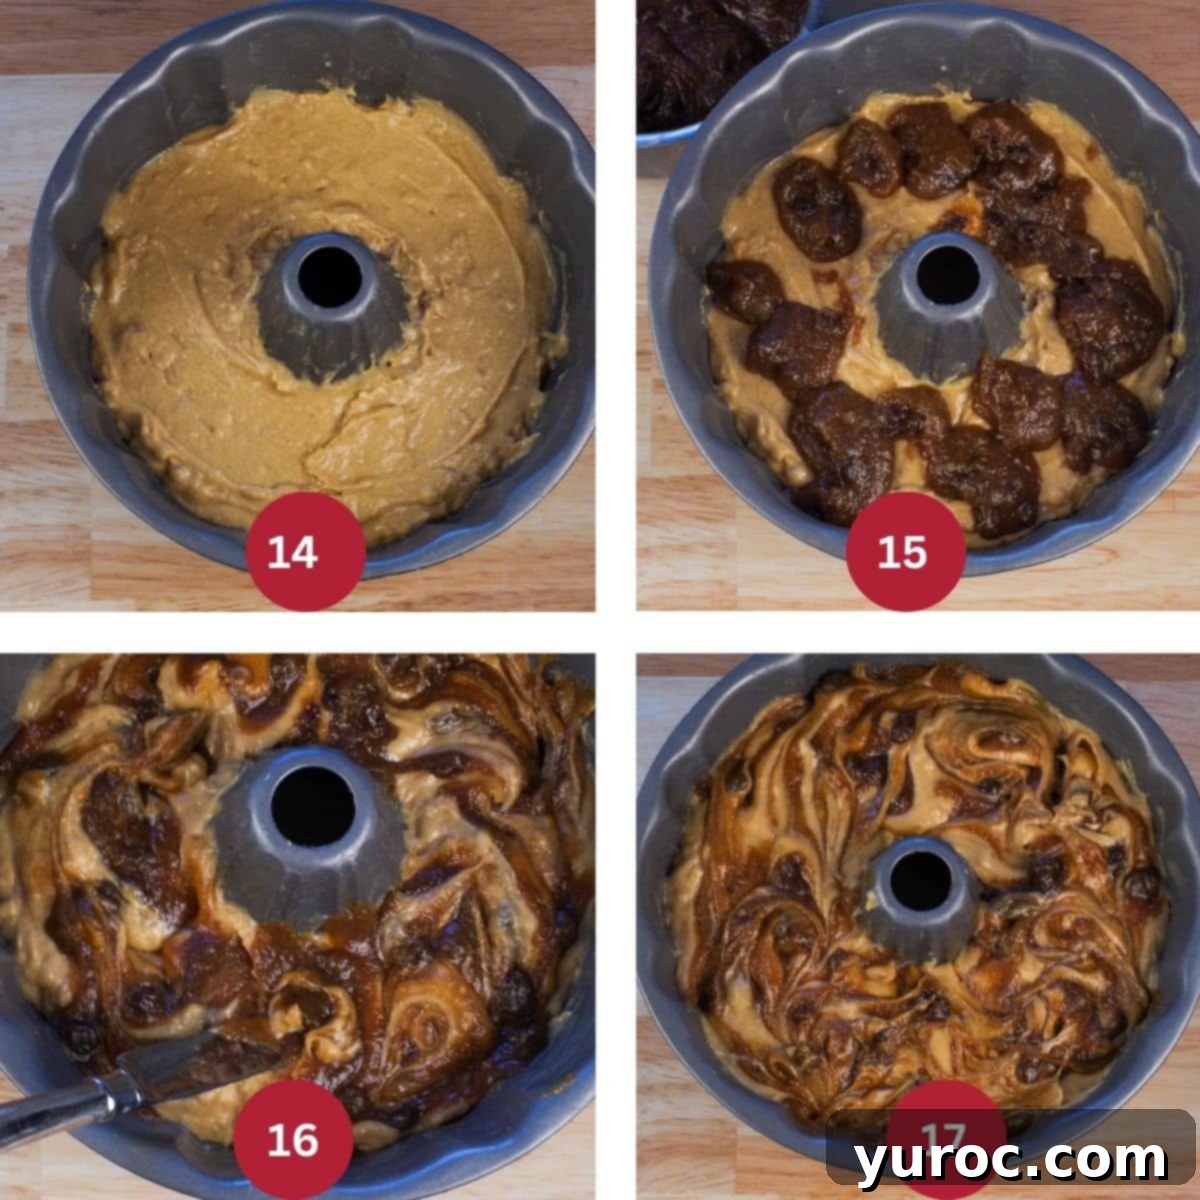
- Pour approximately half of the prepared cake batter evenly into your thoroughly greased bundt cake pan (Image 14).
- Carefully drop spoonfuls of the thickened butter tart swirl filling (using about half of the total filling) over the cake batter in the pan (Image 15).
- Using a butter knife or a thin skewer, gently swirl the filling into the cake batter. Insert the knife deep into the batter, touching the bottom of the pan, and gently lift and twirl it as you move around the pan. This technique creates beautiful, distinct ribbons of filling (Image 16).
- REPEAT THE LAYERS: Pour the remaining cake batter over the swirled filling. Then, drop spoonfuls of the remaining butter tart swirl filling on top. Repeat the gentle swirling technique to create another layer of delicious ribbons (Image 17). As an alternative, you can create a single layer of cake batter, then a single layer of the filling, followed by another cake batter layer, and then use a spatula to swirl it all together, as demonstrated in this video on how to swirl cake batter.
BAKE THE CAKE (STEP 4):
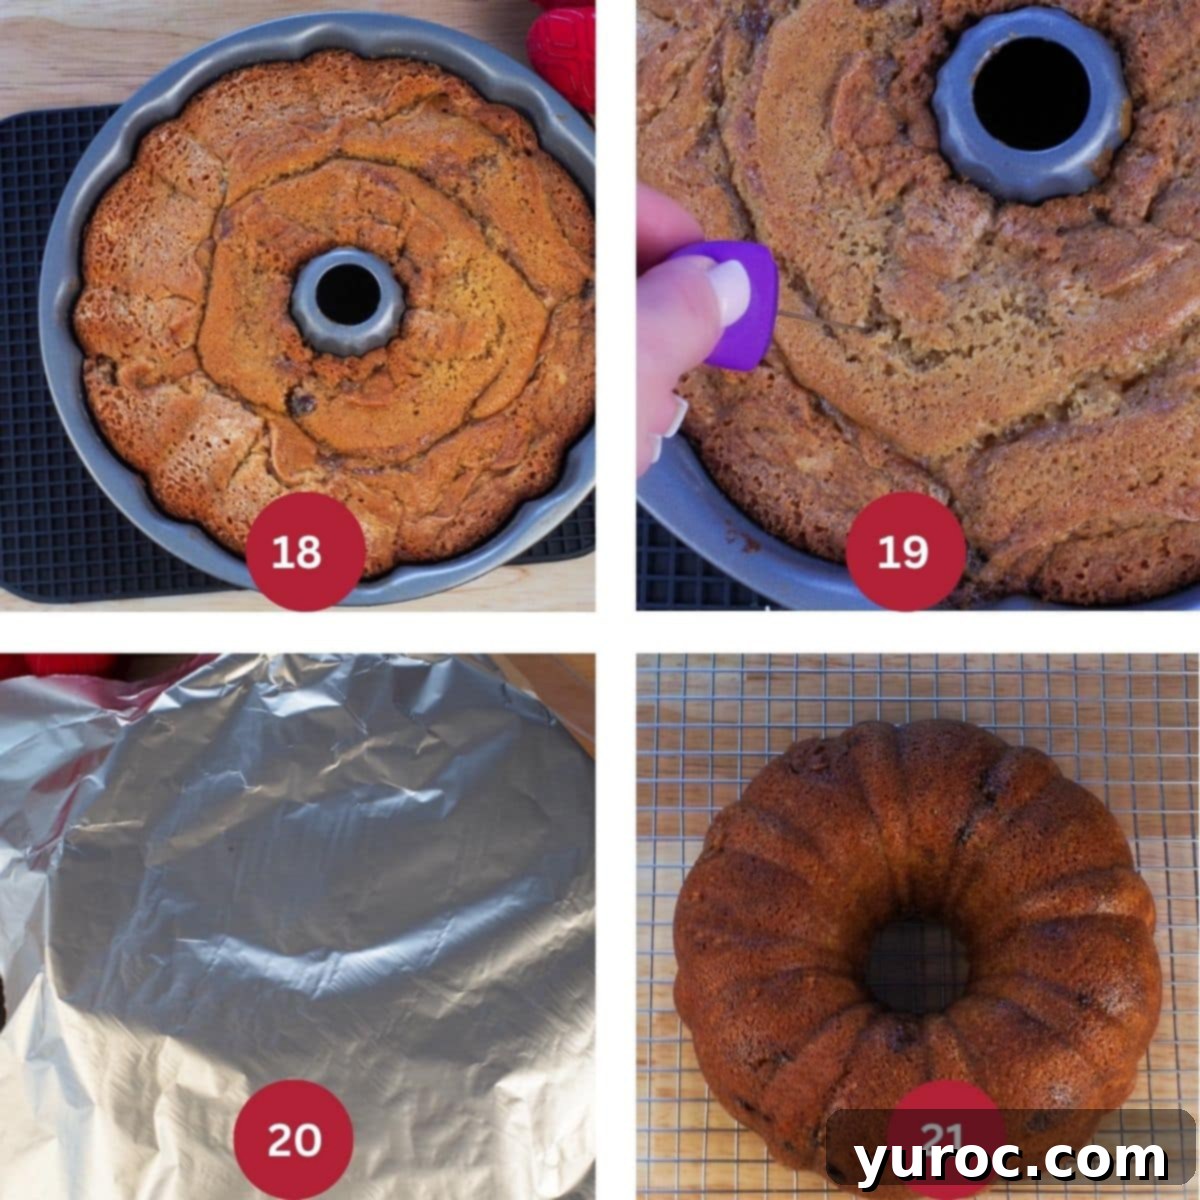
- Place the bundt pan in your preheated oven and bake for approximately 1 hour (Image 18). The baking time can vary slightly depending on your oven.
- To check for doneness, insert a cake tester or a wooden toothpick into the center of the cake (avoiding the filling if possible). It should come out clean, with no wet batter clinging to it (Image 19).
- If the cake isn’t quite done but the top is browning too quickly, loosely cover the pan with aluminum foil to prevent further darkening, then return it to the oven. Check for doneness at 5-minute intervals (Image 20).
- Once baked, remove the cake from the oven and let it cool in the bundt pan, placed on a wire trivet, for at least 10 minutes. This allows the cake to slightly pull away from the sides. After 10 minutes, carefully invert the cake onto a wire rack to cool completely for at least another 15-20 minutes. This ensures the cake is firm enough to handle and prevents it from crumbling (Image 21).
MAKE THE BROWN BUTTER MAPLE GLAZE (STEP 5):
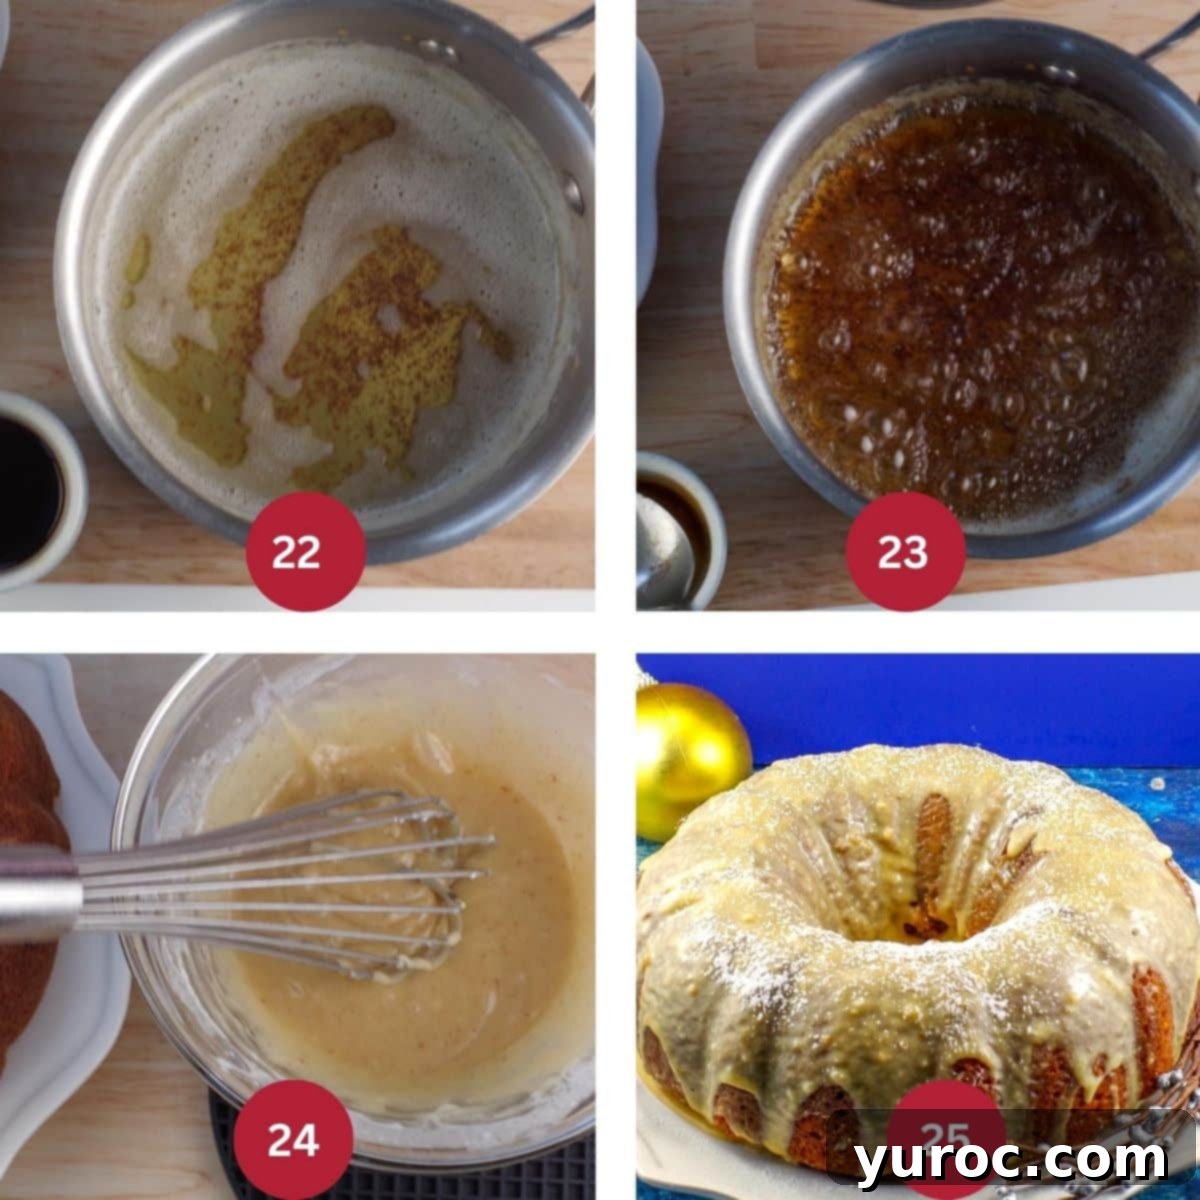
- While the cake cools, prepare the exquisite brown butter maple glaze. In a small saucepan, melt ¼ cup of unsalted butter over medium heat. Continue to cook, stirring occasionally, until the butter transforms into a light golden brown color. You’ll notice tiny brown bits forming at the bottom of the pan, and the butter will emit a distinct, fragrant caramel-like aroma. Don’t worry about any light foam that forms on top. If you’re new to browning butter, this video guide on how to make brown butter can be very helpful (Image 22).
- Remove the browned butter from the heat immediately to prevent it from burning. Let it cool for a couple of minutes before adding 1 teaspoon of maple extract. Be cautious during this step, as the hot butter and extract may bubble up and splatter slightly. Stir well, then set aside to cool to room temperature (Image 23).
- Once the brown butter mixture has cooled, whisk it together with 1 cup of confectioners’ sugar (also known as powdered sugar). Gradually add 3 tablespoons of whipping cream, whisking until the glaze is smooth and thick (Image 24). The ideal consistency should be thick enough to coat a spoon but still pourable. If it’s too thick to drizzle or spoon over the cake, add a tiny bit more whipping cream, a tablespoon at a time, until you reach the desired consistency. Conversely, if your glaze ends up too thin after it cools and hardens, you can always make a second, smaller batch and apply another layer for a double-glazed effect.
- Generously pour or spoon the brown butter maple glaze over the cooled bundt cake, allowing it to cascade down the sides. Let the glaze set and harden for a few minutes.
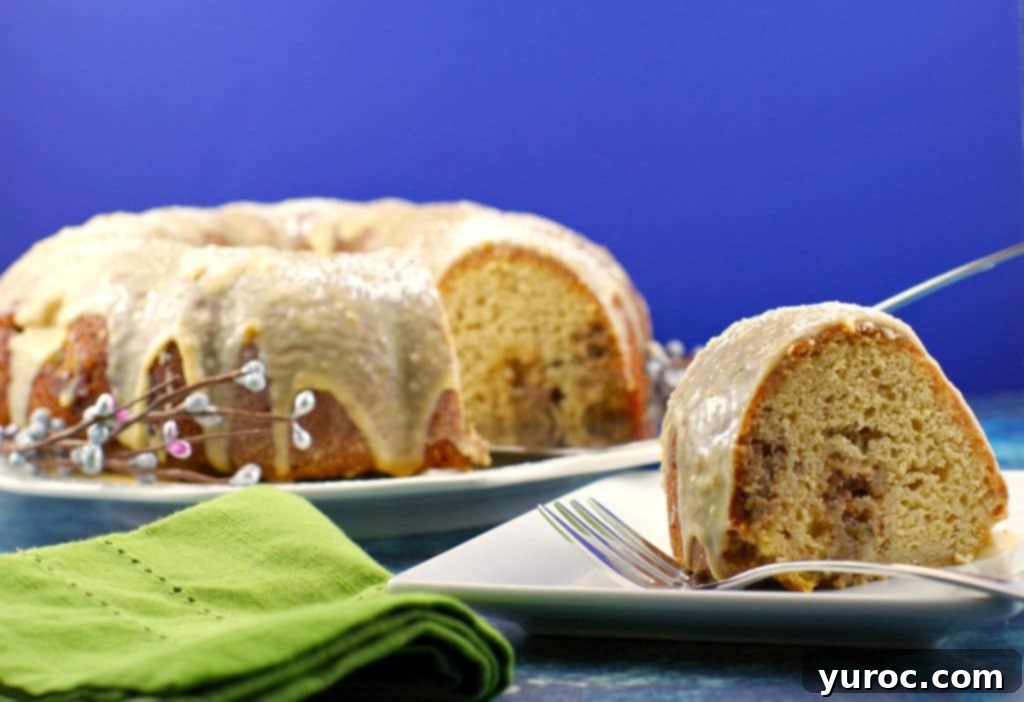
- For the best flavor and texture, it is absolutely essential to refrigerate the cake for at least 1 hour before serving. This chilling time allows the flavors to fully develop and the cake to become firm. Just before serving, you can lightly dust the cake with a sprinkle of powdered sugar for an elegant finish. Always serve this Butter Tart Bundt Cake COLD (Image 25).
Top Tip for Flawless Release
A common concern with bundt cakes is ensuring they release cleanly from the pan. For unparalleled success, I wholeheartedly recommend using Wilton Cake Release (affiliate link). This specialized product is incredibly effective at preventing your cake from sticking, guaranteeing a beautifully intact bundt cake every time. Simply brush it generously into every crevice of your bundt pan before adding the batter.
🥗 What to Serve with Butter Tart Cake
This Butter Tart Bundt Cake, with its substantial and moist crumb, shares a delightful resemblance to a classic pound cake or a rich coffee cake. Its satisfying texture and robust flavors make it an exceptional choice for a Christmas Brunch centerpiece, pairing perfectly with a steaming cup of freshly brewed coffee or a specialty latte.
Beyond brunch, its sweet richness makes it an ideal dessert to follow a lighter holiday meal. Imagine it complementing savory dishes like these elegant Baked Cornish Hens or a vibrant, refreshing Mandarin Orange Salad. The contrast between the light main course and the decadent dessert creates a perfectly balanced dining experience. For an extra touch of indulgence, consider serving slices with a dollop of fresh whipped cream, a scoop of vanilla bean ice cream, or a scattering of fresh berries to cut through the richness.
When I first moved away from my family home and experienced my very first Christmas without them, it wasn’t the material gifts that brought me solace. Instead, it was the familiar, comforting taste of butter tarts that provided a warmth and emotional connection no present could possibly offer. This cake aims to encapsulate that same comforting feeling.
🌡️ Storage Tips for Your Butter Tart Bundt Cake
To keep your Butter Tart Bundt Cake fresh and delicious, proper storage is key:
- Refrigerator Storage: This cake maintains its wonderful flavor and moist texture beautifully when stored in the fridge. Place any leftover cake in an airtight container to prevent it from drying out or absorbing other odors from the refrigerator. It will stay fresh and delightful for 2-3 days. Remember, the glaze sets best when chilled, and the flavors meld wonderfully.
- Freezer Storage: If you’re planning to enjoy this cake over a longer period, or if you want to bake ahead for an event, this cake freezes exceptionally well. Leftovers can be frozen in an airtight container for up to 3 months. For optimal results, if you intend to make the cake more than a day or two in advance, I recommend freezing the baked (and cooled) cake *before* applying the glaze. Once you’re ready to serve, thaw the cake completely in the refrigerator, then prepare and apply the brown butter maple glaze for the freshest taste and appearance. This method ensures the glaze is perfectly smooth and shiny upon serving.
❔ Recipe FAQs for Butter Tart Bundt Cake
It’s crucial for the butter tart filling to be thick before baking. If your filling is still too runny after simmering, you can often fix it by whisking in an additional ½ to 1 teaspoon of cornstarch (mixed with a tablespoon of cold water) and cooking it longer over low heat until it reaches a thick, pudding-like consistency. Ensure it cools completely, as it will thicken further upon chilling. If, despite your best efforts, the cake bakes with a runny center, don’t despair! Allow the cake to cool and chill thoroughly for at least an hour. Then, slice the cake into individual pieces, arrange them in a 9×13 inch lasagna pan, cover with foil, and bake for an additional 15 minutes. This will help the filling set further.
Absolutely! This butter tart cake is an excellent make-ahead dessert, perfect for easing holiday stress. If you plan to bake it more than a few days in advance, I highly recommend freezing the baked and cooled cake in an airtight container. When you’re ready to serve, simply defrost the cake completely in the refrigerator. You can then prepare and apply the brown butter maple glaze fresh, ensuring it has the perfect pourable consistency and sets beautifully for presentation.
While a bundt pan is ideal for this recipe due to its even heat distribution and decorative shape, you can adapt the recipe for other pans. A 9×13 inch baking pan would work, resulting in a sheet cake rather than a bundt. You might need to adjust baking time (likely less) and monitor closely. Alternatively, an angel food cake pan could be used, but the fluted sides of a bundt pan provide better heat transfer and a more appealing presentation for this particular cake. Ensure whatever pan you use is thoroughly greased and floured, or use a cake release spray.
Now, I find myself in the heartwarming position of being the one who bakes my Grandma’s cherished butter tart recipe every Christmas – a recipe I consider the perfect butter tart! So, if you’re searching for an unforgettable Christmas bundt cake to grace your holiday table this year, you simply must try this incredible butter tart cake. It’s a taste of Canadian tradition, wrapped in holiday cheer, and guaranteed to bring smiles.
🎄 More Festive Christmas Desserts to Explore
- Grand Marnier Cheesecake with Chocolate Glaze
- Cranberry Bread Pudding Cheesecake
- Cranberry Sauce Coffee Cake (with leftover cranberry sauce)
- Black Forest Yule Log Cake
Did your family ❤️ this recipe? Did you know that commenting and ⭐ rating recipes is one of the best ways to support your favorite recipe creators? If you LOVED this recipe, please comment and rate it in the recipe card below or share photos on social media using the hashtag #foodmeanderings or tagging @foodmeanderings ! Your feedback means the world!

📋 Butter Tart Bundt Cake Recipe
Print Recipe
Pin
Save RecipeSave Recipe
Rate
Add to Shopping ListGo to Shopping List
Equipment
-
bundt pan
Ingredients
For the Butter Tart Swirl Filling:
- 1 teaspoon vanilla extract
- ¼ cup + 2 Tblsp whipping cream (33-36% fat)
- 2 tablespoons + 2 teaspoon unsalted butter
- 3 large eggs
- 1 ½ cups brown sugar
- 1 ½ teaspoons white vinegar
- 2 teaspoons cornstarch
- ½ cup raisins (chopped pecans can be substituted)
For the Bundt Cake:
- 1 teaspoon white vinegar
- 1 cup milk (any fat content)
- 2 ½ cups sifted all-purpose flour
- ½ teaspoon baking powder
- 1 cup unsalted butter softened, high quality
- 2 cups brown sugar
- 1 teaspoon vanilla extract
- 1 teaspoon butter extract
- 2 large eggs
- ¼ cup whipping cream (33-36% fat)
- 1 teaspoon baking soda
For the Brown Butter Maple Glaze:
- ¼ cup unsalted butter
- 1 teaspoon maple extract
- 1 cup confectioners sugar (powdered sugar)
- 3 tablespoons whipping cream (33-36% fat)
Instructions
-
Thoroughly grease your bundt cake pan with non-stick cooking spray or a cake release product. Preheat oven to 325 degrees F (162 degrees C).
Make the Butter Tart Swirl Filling:
-
In a medium pot on the stovetop, combine 1 teaspoon vanilla extract with ¼ cup + 2 Tblsp whipping cream. Heat to medium-low until warm. Then, add 2 Tblsp + 2 teaspoon unsalted butter and stir until melted.
-
In a separate large bowl, combine 3 eggs and 1 ½ cups brown sugar. Whisk vigorously until smooth.
-
Add the egg mixture to the warm cream mixture in the pot. Simmer on low heat. Then, whisk in 1 ½ teaspoon vinegar and 2 teaspoon cornstarch until smooth.
-
Stir in ½ cup raisins or chopped pecans.
-
Continue whisking constantly until the filling thickens to the consistency of thick gravy, about 12-15 minutes on medium-low heat. Be patient, as it typically thickens significantly in the last 5-7 minutes. If not thick enough, add a little more cornstarch.
-
Remove from heat and allow to cool completely. It will become very thick, like pudding, as it chills. This thick consistency is crucial for the cake’s success. For faster thickening, place in the freezer for 30 minutes.
Make the Bundt Cake:
-
Pour 1 teaspoon white vinegar into 1 cup milk and let stand for 5 minutes to create “buttermilk”.
-
In a separate bowl, mix 2 ½ cups sifted all-purpose flour and ½ teaspoon baking powder together; set aside.
-
Cream 1 cup softened unsalted butter and 2 cups brown sugar with an electric mixer until light and fluffy. Beat in 1 teaspoon each of vanilla and butter extracts, then 2 large eggs one at a time, followed by ¼ cup whipping cream.
-
Mix the dry flour ingredients into the wet mixture until just combined.
-
Stir 1 teaspoon baking soda into the milk and vinegar mixture (the “buttermilk”) and allow it to bubble. Gently fold this into the cake mix until just combined, being careful not to overmix.
-
Pour ½ of the cake batter into the prepared bundt pan. Drop spoonfuls of about ½ of the cooled butter tart swirl filling over the cake batter. Gently swirl with a knife, cutting deep and lifting the batter to create ribbons.
-
Pour in the remaining cake batter and swirl in the remaining butter tart filling using the same technique.
-
Bake in the preheated oven for approximately 1 hour, or until a cake tester/toothpick comes out clean when inserted into the cake (avoiding the filling).
-
If the cake is browning too much but not yet done, loosely cover it with foil and continue baking, checking at 5-minute intervals.
-
Allow the cake to cool in the bundt pan, placed on a wire trivet, for at least 10 minutes.
-
Carefully invert the cake from the pan onto a wire rack and let it cool completely for another 20 minutes before glazing.
Prepare the Brown Butter Maple Glaze:
-
Brown the butter: Melt ¼ cup unsalted butter in a small saucepan over medium heat. Continue to cook, stirring occasionally, until the butter turns a light golden brown with small brown bits at the bottom and has a fragrant, nutty, caramel odor. (Refer to the video in the recipe notes if unsure how to brown butter).
-
Remove the browned butter from heat. After 1-2 minutes, carefully add 1 teaspoon maple extract (it may bubble and splatter slightly). Stir well and cool to room temperature. Whisk the cooled brown butter mixture with 1 cup confectioners’ sugar and 3 Tblsp whipping cream until smooth and thick.
-
Pour the brown butter maple glaze generously over the cooled cake, allowing it to drizzle down the sides. Let the glaze harden for a few minutes.
-
For the best flavor and texture, refrigerate the cake for at least 1 hour before serving. Dust with a little powdered sugar if desired, and serve COLD.
Notes
Mini Butter Tart Bundt Cakes: This recipe can easily be adapted for mini bundt cakes. Reduce baking time to approximately 30 minutes, or until a cake tester comes out clean. They are perfect for bake sales or individual servings.
Nut Options: Instead of raisins, use chopped pecans, walnuts, or even a mix of dried cranberries for added flavor and texture in the filling.
Cornstarch Alternatives: If you don’t have cornstarch, you can use arrowroot powder (1:1 ratio, mixed with a cold liquid first) or create a flour-based roux to thicken the filling.
🎥 Video Resources:
Video on How to Make Brown Butter: Watch Here
Video on How to Swirl Cake Batter: Watch Here
💡 Pro Tips for Baking Success:
- Room Temperature Ingredients: Always ensure your butter and eggs are at room temperature for a smooth, lump-free, and well-emulsified batter. This is essential for proper creaming and cake texture.
- Quality Butter: Use high-quality unsalted butter (like Lactantia in Canada) to control salt content and avoid excess water, which can affect the cake’s consistency.
- Bundt Pan Use: The unique shape of a bundt pan promotes even heat transfer, resulting in a perfectly baked cake. Grease it thoroughly!
- Perfect Swirl: Don’t over-swirl the filling! Use a knife to cut deep and lift gently, creating distinct ribbons rather than a fully blended mixture.
- Cake Release: For easy removal, I highly recommend “Wilton Cake Release” – it’s incredibly effective at preventing sticking in intricate bundt pans.
- Thick Filling: The butter tart filling MUST be thick (like pudding) before adding to the cake. A thin filling will result in an undercooked, wet cake. Be patient during cooking and cooling for proper thickening.
- Chill Time: Allow adequate cooling and chilling time for the cake. Serving it cold enhances the flavors and texture, especially of the gooey filling and set glaze.
